
24 December, 2017
Christmas is nearly here
And I still have to put up the decorations, wrap presents and make a card. So this week I'll keep it simple.

17 December, 2017
With Christmas just around the corner
It's summer here, and everyone is feeling sociable, so I have had lots of visitors. No problems - I like visitors, but feel guilty when they leave because I've been chatting instead of working. Ah well plan like you'll live forever, but live like you'll die tomorrow is my motto! Bertrand, of the SibLim Club, is presently anchored in the river, and members Mark and Phil are back from Oz. Pete and Linda returned from their Pacific tour recently and plans are afoot from those lucky junkies with boats, as to when to assemble in the Bay of Islands for the Tall Ships.
 In the meantime, I've been plodding on in the forecabin. I removed the fiddle along the counter top and glued it back into place. In spite of aligning it carefully, using a hand screwdriver very gingerly and - I thought - making sure that I found all the screw holes, I managed to get it in the wrong place, so it had to come off again and I had to scrape all the epoxy off before it kicked off. (As it is now around 30C in the shed from about 1100 onwards, this had to be done in a hurry.) The second time I rested it in position on clamps and that went so easily that I wondered why I hadn't thought of it before. I also fitted fiddles to the athwartships bookshelves.
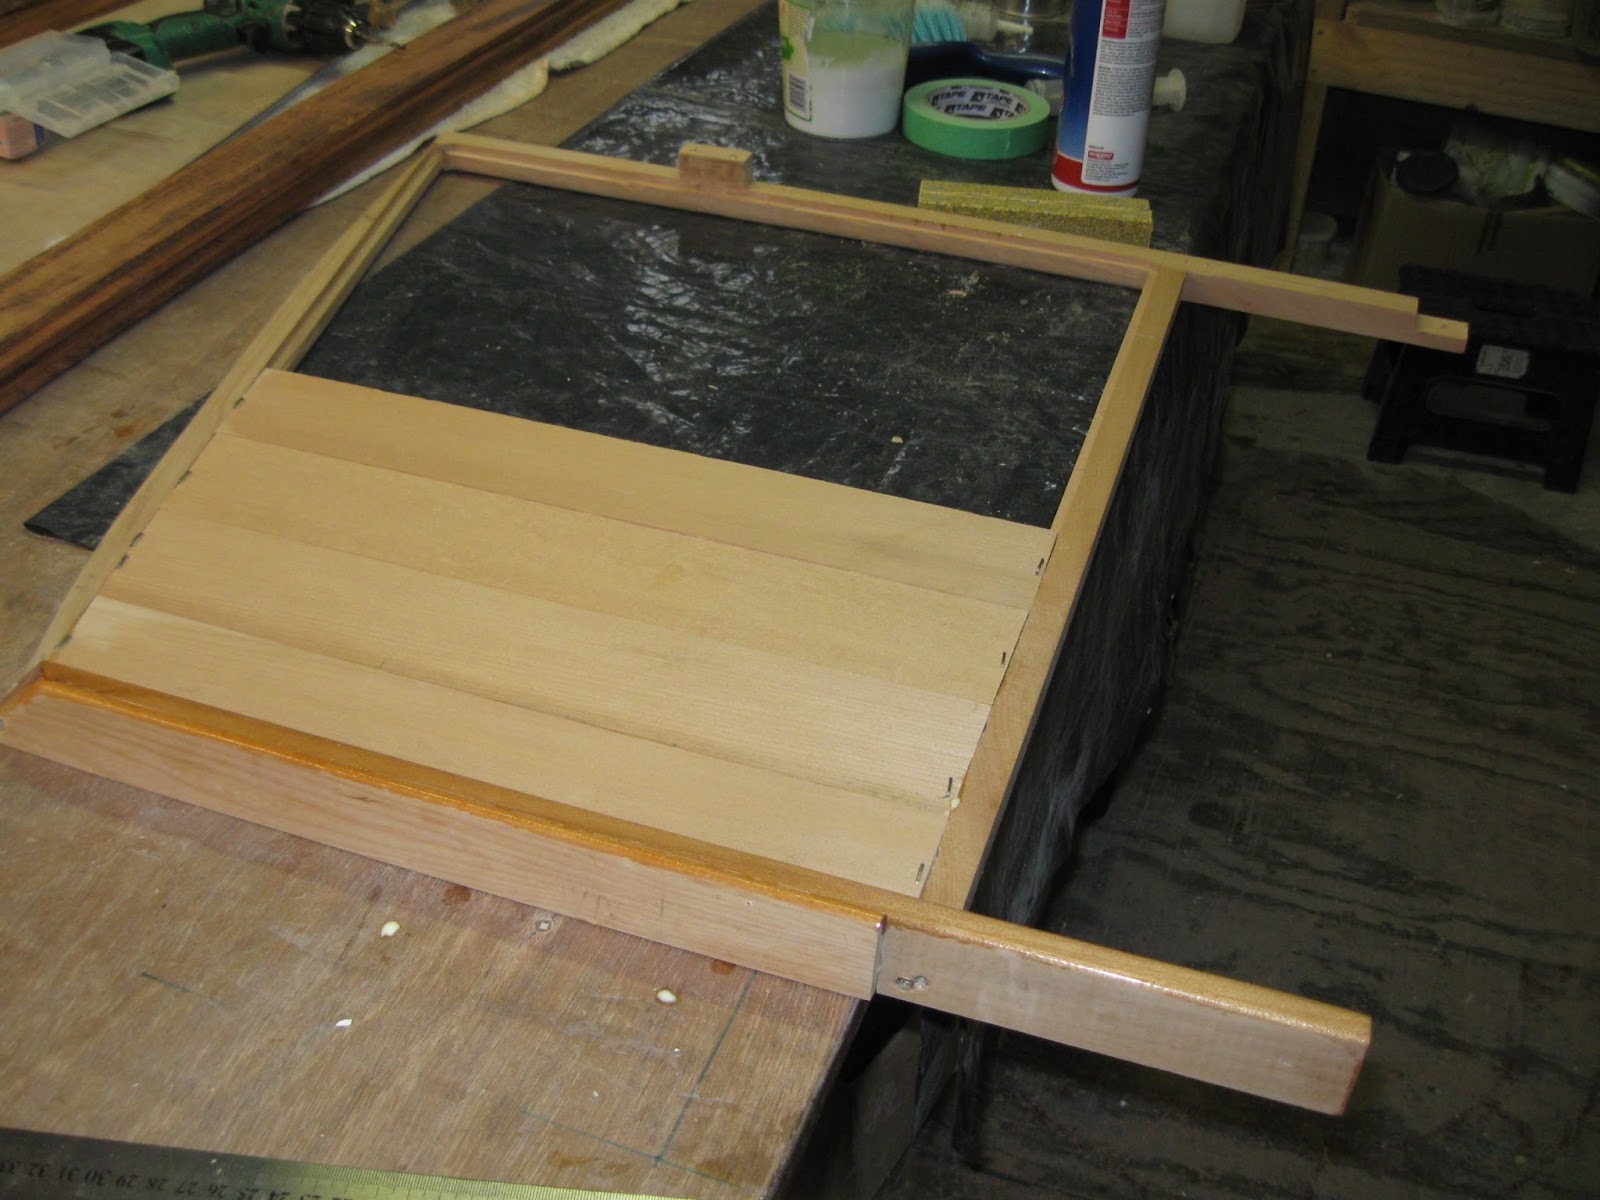
 I then had to laminate up the fiddle for the bookshelf over the bunk. The obvious thing was to use the existing one as a pattern, which was made easier due to the fact that I didn't want the new one to be as long. I made it of two layers and it sprang back, so I then had to add a couple more to it. These were thinner - I didn't want the fiddle to be too heavy - and they did a good job of locking the curve in.
 That done, I had to fit supports for it. The shelf is of the right size for books like those the Mariners' Library (Rupert Hard-Davis), used to print. Once the libraries had every book on their shelves, but now you rarely see them. I keep hoping someone will bring them out as e-books - perfect for sailors with not too much space for books!
 Then I fitted the little brass turnbuttons to stop
drawers and doors falling out. These could be considered an
extravagance, but they do look nice and work very well. Here's the locker with the turnbuttons in place. I added little hemispheres of tigerwood to the drawers, which don't stick out as far as the fiddle. This will also prevent the relatively soft kauri from getting marked from a heavy drawer leaning against the turnbutton and stop them sliding back and forth in irritating fashion as we roll down the Trade Winds. (Yeah Right!)
Then I fitted the little brass turnbuttons to stop
drawers and doors falling out. These could be considered an
extravagance, but they do look nice and work very well. Here's the locker with the turnbuttons in place. I added little hemispheres of tigerwood to the drawers, which don't stick out as far as the fiddle. This will also prevent the relatively soft kauri from getting marked from a heavy drawer leaning against the turnbutton and stop them sliding back and forth in irritating fashion as we roll down the Trade Winds. (Yeah Right!)
 The big bookshelves were coated and you can see that there is room for Junks and Sampans. I trust that there will be sufficient books to hide the bare plywood. I really didn't want to panel the section between the two shelves. I can't wait to see them filled!
 The next job, which I think is the last one required to complete the fitting out of the forecabin, was to veneer the end grain of the plywood with a kauri 'clashing' (as it is apparently called here). The first layers were a bit of a disaster, because although the wood was only about 2mm thick, it really didn't want to bend. It caused a lot of frustration and bad language.
 Sawing some thin stuff off another piece of kauri that Marcus
discovered in the wood pile and gave to me, sorted the issue. For some
reason, this wood was a lot more flexible. And, it was long enough to
go round in one length.
Sawing some thin stuff off another piece of kauri that Marcus
discovered in the wood pile and gave to me, sorted the issue. For some
reason, this wood was a lot more flexible. And, it was long enough to
go round in one length.
 While I was at it, I started on the saloon doorway, too. By now I have the knack. The first long length I put in, I - foolishly - precoated, with the result that epoxy got spread around all over the place. The second one, I carefully coiled up, holding it together with masking tape. By the time I got to the third one I had worked out to secure the end with masking tape and then to carefully unwind the strip of veneer, make loose loops of masking tape at each 'corner', so that it couldn't escape, but on the other hand could slide easily as it got taped into place. There are still a few gaps, but hey - this is the 'country cottage look'! It uses miles of masking tape! I plane each one down with a teensy-weensy plane before putting on the next layer - just putting generous amounts of epoxy on the wood already in place. (I can hear teeth being sucked, but it's not exactly structural.)
 And while the glue has been kicking off, I've been doing The Big Sand. Not a nice job: hot and noisy with sander and vacuum going full blast. It's going to be 'fun' varnishing it all in these temperatures. I have found that the only solution is to add lots of polyurethane thinners. The manufacturers' chemists would probably weep at this comment, but from past experience, the coating doesn't seem adversely affected, although I suppose it must be. I guess it's just so good anyway, that at even 70% efficiency, it's quite wonderful!
So once I've posted this - and sent out a few Christmas e-cards - I'd better get on with it.


So once I've posted this - and sent out a few Christmas e-cards - I'd better get on with it.
03 December, 2017
I can understand why people skimp on coating with epoxy
I am not really the soul of patience and am in accord with Tilman that it is a virtue easily exhausted by exercise. I am more than ready to move on to another stage in the boat and this final locker in the forecabin is really proving rather testing: I keep getting held up because there is sticky wood around which can't be handled or touched.
Of course there are approximately 10,732 other jobs I could do while the epoxy goes hard, but I can only hold so much in my brain and I fear that if I move on to another job, I shall make a mess of what I'm doing here, by forgetting some crucial part. I keep forgetting things anyway, like (as Marcus pointed out), what do I intend to do to keep the books in the port bookshelf? (Bother.) And how long am I going to put off trimming the door frame? (Go away.) I also spent an inordinate amount of time trying to use the remaining offcuts from to make an end to a couple of big bookshelves I've been making. Not possible so I made a nice panelled bulkhead which will probably look better anyway. The 'big bookshelves' is a misnomer: it's more accurately the bookshelves for big books, dominated by my need to find an easily accessible home for my greatest treasure: The Junks and Sampans of the Yangtze, given to me by my friend Gary Underwood, prolific designer of houses and boats. He has been slowly offloading some of his fantastic library and I was the lucky person he thought of for this book. I have managed to get most of G.R.G. Worcester's books, which are delightfully written and beautifully illustrated. I look forward to the time when I can read them properly and at leisure. However, J&SY is a mighty tome and set the standard for the bookshelves that were to be built. In addition, there are David Thatcher's cruising guides plus some others, along with several other 'oversize' books that, for various reasons, I want to keep. They could all be put into lockers, of course, but I'd prefer to get to them more easily. The space at the forward end of the forecabin (once set aside for a sewing machine, that, alas, would not fit easily) seemed to offer the perfect solution.
 I had some kauri left over from doing the drawer fronts so I glued it together (using Gorilla to save a bit of time.) Having framed up the area, I carefully fitted the two shelves.
 Having decided that I had insufficient left for the end of the cabinet, I scouted around and found a bit of kauri panelling that was a bit too narrow to use elsewhere, but could be used to make a perfect endpiece for the shelves. I glued up a frame and then routed round to make a rabbet in which to set the panels.
 Because the whole area had been intended to be an enclosed locker (and The Great One disapproved of the weight of the kauri panelling) I then had to panel the space under the shelves, which will be seen. Again, short ends that I had refused to throw away came in useful for this.
 This is where my patience was tried. I was more than ready to assemble the whole lot, but the panel is better coated on the flat and the bottom of the shelves required a good thick layer of epoxy to ensure that they stay stable. At least I won't have to varnish them!
So time to go and actually start gluing it all together!
Of course there are approximately 10,732 other jobs I could do while the epoxy goes hard, but I can only hold so much in my brain and I fear that if I move on to another job, I shall make a mess of what I'm doing here, by forgetting some crucial part. I keep forgetting things anyway, like (as Marcus pointed out), what do I intend to do to keep the books in the port bookshelf? (Bother.) And how long am I going to put off trimming the door frame? (Go away.) I also spent an inordinate amount of time trying to use the remaining offcuts from to make an end to a couple of big bookshelves I've been making. Not possible so I made a nice panelled bulkhead which will probably look better anyway. The 'big bookshelves' is a misnomer: it's more accurately the bookshelves for big books, dominated by my need to find an easily accessible home for my greatest treasure: The Junks and Sampans of the Yangtze, given to me by my friend Gary Underwood, prolific designer of houses and boats. He has been slowly offloading some of his fantastic library and I was the lucky person he thought of for this book. I have managed to get most of G.R.G. Worcester's books, which are delightfully written and beautifully illustrated. I look forward to the time when I can read them properly and at leisure. However, J&SY is a mighty tome and set the standard for the bookshelves that were to be built. In addition, there are David Thatcher's cruising guides plus some others, along with several other 'oversize' books that, for various reasons, I want to keep. They could all be put into lockers, of course, but I'd prefer to get to them more easily. The space at the forward end of the forecabin (once set aside for a sewing machine, that, alas, would not fit easily) seemed to offer the perfect solution.
 I had some kauri left over from doing the drawer fronts so I glued it together (using Gorilla to save a bit of time.) Having framed up the area, I carefully fitted the two shelves.


So time to go and actually start gluing it all together!
28 November, 2017
Oryx is for sale!
As I mentioned in my previous post, Oryx is back in New Zealand. Pete tells me that, once again, he wants to try out another boat. He says he has 'one last boat to build', but at the moment, he'd rather buy something already out there - preferably with junk rig to save the effort of conversion, but first he has to sell Oryx.


For a 33ft boat, she has heaps of accommodation: two double cabins, one single, a good galley and heads and a saloon and chart table on the bridge deck. For £45,000, you get a lot of boat for your money. Pete built her in the UK, sailed the Atlantic coast of South America and over to South Africa. From there he sailed across the Indian Ocean to Oz and then came to NZ. This winter he has been exploring French Polynesia and Tonga. She sounds to be a pretty fast boat.
If you want to see photos of the interior and read up on her specs, you can find it all here. If you want to contact Pete, you can easily do so if you are a member of the Junk Rig Association: his details are in the Membership Directory - or leave a comment on this blog with your email address (it won't be published until I've moderated it) and I'll forward it to him.
I hope Oryx can soon find a new owner who will appreciate this special boat!
26 November, 2017
Oooh! What a week!
Some weeks, the boat leaps forward and I think that it may even swim one day. Other weeks not a lot happens - on the boat that is. Life has a way of disturbing one's boatbuilding routine. If I were desperate to go sailing again, this might by very upsetting. However, much as I would love to be back on the water (how can anyone tolerate living ashore?) and back to sanity, going sailing again is a pleasant promise for the future rather than a burning desire. There are far worse ways to spend the days than building a boat and when that progress is interrupted by people that I value, it's an interruption I can happily handle.
A telephone call on Monday evening from Roger, told me that he had arrived safely back in Godzone, on the good ship Oryx, with Linda and skipper Pete. They'd had a bit of a bumpy ride off N Cape and were happy to be safely in harbour. Rob and Maren were driving up to see them the next day: did I want to come too? My feeble protestations of "I shouldn't really", were shouted down, so I happily agreed and made arrangements to hitch a ride up with R&M.
Oryx was anchored off Paihia; Rob had brought his inflatable rubber duck, but as I'd gloomily envisaged, the light E breeze was quite sufficient to make launching off the beach something of a drama. Finally, with me soaked half way up my thighs, Rob wringing wet from a complete dunking and Maren sitting primly in the bow wondering what all the fuss was about, I shoved them off and climbed into Crake, which Pete was holding offshore, waiting. As we rowed out he said that the drama off N Cape was caused when a wave had rudely climbed into the cockpit, completely filling it and managing to find its way below. "The wind wasn't that bad," he told me, "Force 8 gusting 9, but the seas were terrible - the worst I've seen for a long time". Spring tides rushing round the top of North Island, colliding with the SE current from the Tropics which was flowing against the SE gale had stirred things up a treat, it would appear. However, the gallant crew was stirred rather than shaken and a jolly afternoon was enjoyed by all, before we all headed back to Whangarei, with Roger on board.
A couple of days later Dave and Rosemary, back from their 6 months in Oz, came by to inspect progress and tell me all about the house and garden they've been building. Then Roger having hitched a ride up the harbour on Tystie, came to view progress, together with Martin and Renate and Marcus broke out some beer ...
So, the long and the short of it is that there isn't that much progress to report. I know Real Builders will be shaking their heads and sucking their teeth, but when I'm old(er) and grey(er) I suspect I'll remember my friends' spontaneous visits with much more pleasure than gluing pieces of wood together. However, wood has been glued:
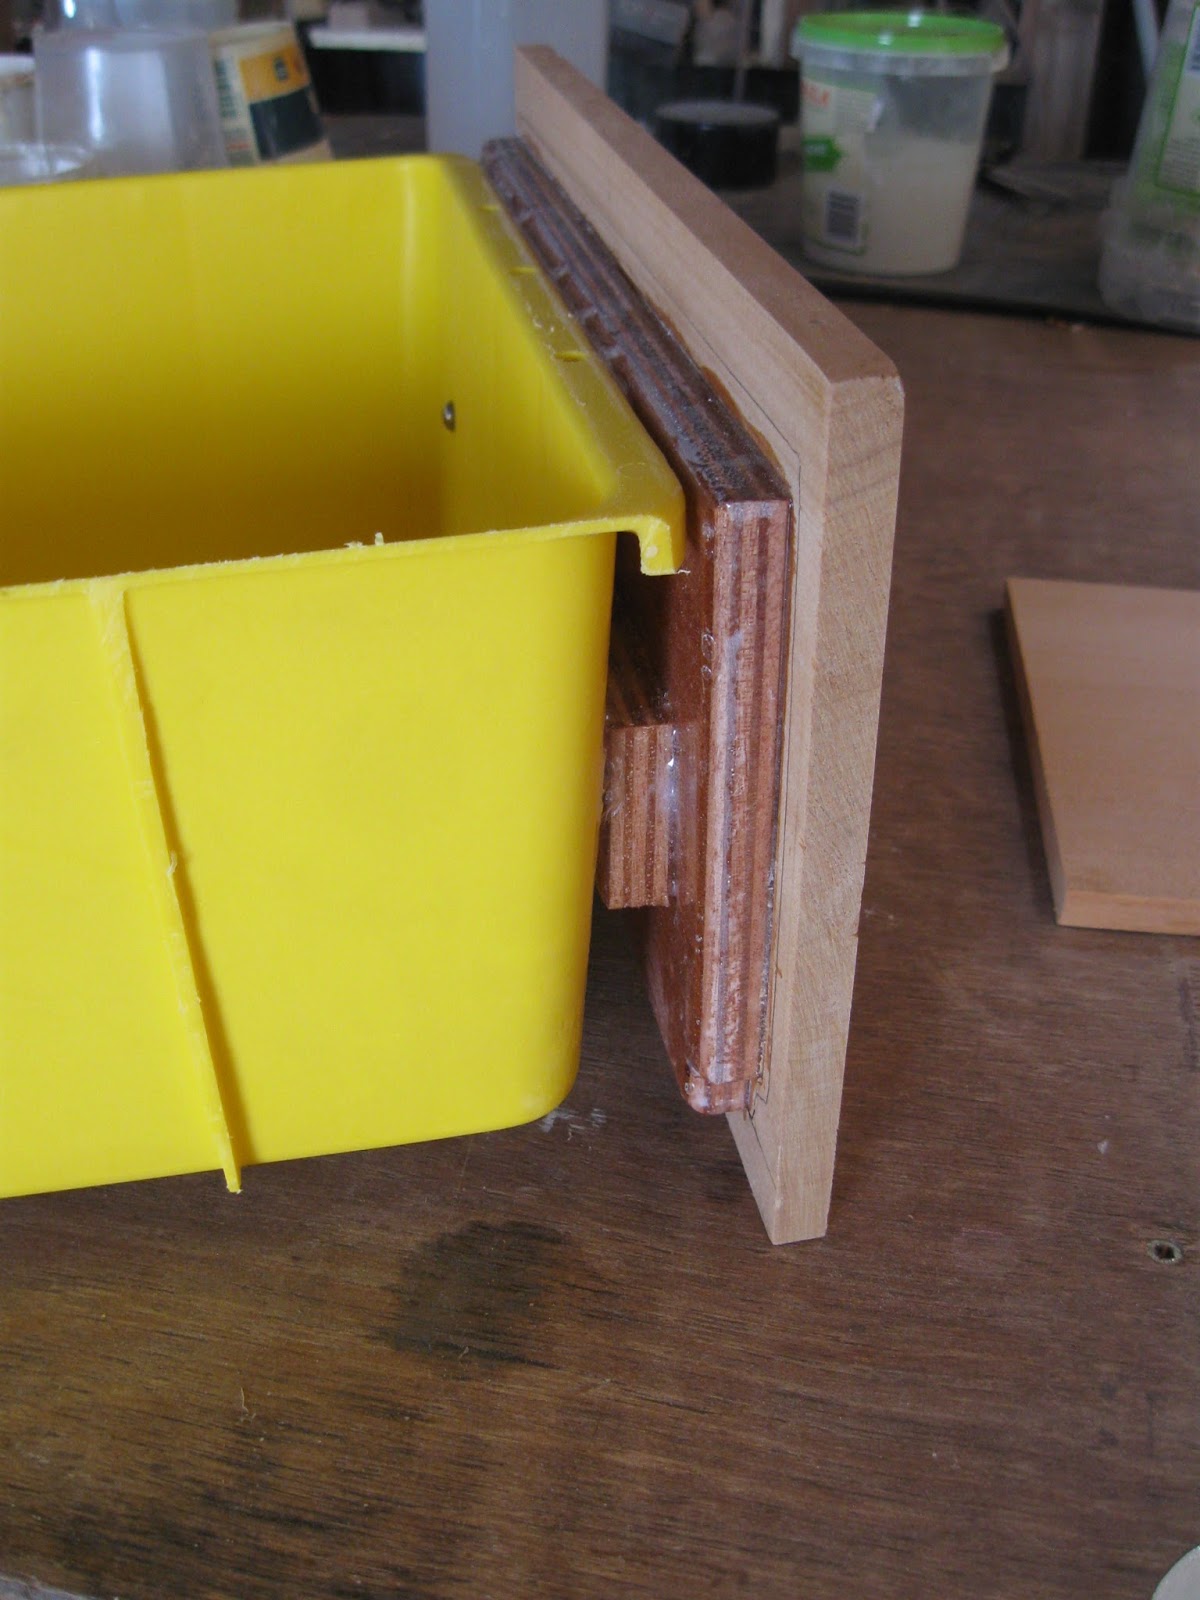
 You may recall that I decided to cheat around the drawers in the forecabin. There is already heaps of stowage and I felt no need to use up every square centimetre. And making a perfectly rectangular box does somewhat challenge my skills. But, as those following with close attention will have noted, I do like things to Look Nice, so I am fitting kauri fronts to the plastic boxes. The kauri was acquired from a delightful wood turner - a friend of a friend - who is 'slowing down' and is offloading some of his shed full of stock. Lovely stuff. I had one of the one-inch boards sawn up to provide the drawer fronts.
I thought the boxes could do to be a bit stiffer, so screwed plywood to the front of them to form the interior front of the box. By making the kauri slightly larger, this would ensure that the boxes couldn't slide in too far. I shall use simple brass turnbuttons to stop them coming out too far.
 The front of the box had stiffeners down it, between which I placed small pieces of ply for attaching the large ones. They were glued together and a screw goes through both pieces: the plastic is, of course, impossible to glue to. However, with the small pieces of ply snugly between the stiffeners, the drawer is reassuringly stiff. The kauri fronts were then fitted as accurately as possible - not very - and individually fitted back in the locker and trimmed into some sort of symmetry.
 In the meantime, I had fitted the tigerwood counter top which I think looks fantastic. To be honest it's all rather enormous - ideally I'd have made the whole thing a bit lower, but the stringer that it's resting on is the best part of 50mm from top to bottom and I'd have had to lower the counter far more than I wanted to be able to fit it under the stringer with a reasonable gap between the two. It would have looked a bit odd snugged up under the stringer. Anyway, I now have another enormous area of storage; but an unexpected benefit is that the forward end will take an Admiralty chart folded in two. It's not the ideal place for dashing to and from the cockpit, but would be perfect for more leisurely chart work.
 A substantial 70mm fiddle finishes it off. Here are some of the drawers getting their final fitting. The doors have their tongues' and the clamps are holding in small pieces of wood that stop the doors going in too far. No doubt a Real Builder would have made a nice rabbeted frame and save himself from this fiddly work. I don't trust my skills to try this and besides, it requires a lot more wood. The main thing to me is that the doors will function and, of course, Look Nice. I can see a big varnishing job coming up!
Oryx was anchored off Paihia; Rob had brought his inflatable rubber duck, but as I'd gloomily envisaged, the light E breeze was quite sufficient to make launching off the beach something of a drama. Finally, with me soaked half way up my thighs, Rob wringing wet from a complete dunking and Maren sitting primly in the bow wondering what all the fuss was about, I shoved them off and climbed into Crake, which Pete was holding offshore, waiting. As we rowed out he said that the drama off N Cape was caused when a wave had rudely climbed into the cockpit, completely filling it and managing to find its way below. "The wind wasn't that bad," he told me, "Force 8 gusting 9, but the seas were terrible - the worst I've seen for a long time". Spring tides rushing round the top of North Island, colliding with the SE current from the Tropics which was flowing against the SE gale had stirred things up a treat, it would appear. However, the gallant crew was stirred rather than shaken and a jolly afternoon was enjoyed by all, before we all headed back to Whangarei, with Roger on board.
A couple of days later Dave and Rosemary, back from their 6 months in Oz, came by to inspect progress and tell me all about the house and garden they've been building. Then Roger having hitched a ride up the harbour on Tystie, came to view progress, together with Martin and Renate and Marcus broke out some beer ...
So, the long and the short of it is that there isn't that much progress to report. I know Real Builders will be shaking their heads and sucking their teeth, but when I'm old(er) and grey(er) I suspect I'll remember my friends' spontaneous visits with much more pleasure than gluing pieces of wood together. However, wood has been glued:

 | ||||


19 November, 2017
First, some musings
Well, this is a blog. But if you are only interested in the boatbuilding part of it, then go down the page until you see 'Back to Boatbuilding' in big, friendly letters.
I heard a programme on the radio recently where the interviewee was pointing out the difference between being a materialist and being a consumer. They are, in fact, antithetical because a materialist loves things and a consumer loves buying things. So, a materialist hangs on to her beloved 10-year old boots, a consumer dumps them for new ones. Materialists cherish their possessions, consumers only enjoy their newness. His point was that we need to appreciate the difference so that we can live in a prosperous world, with a lively economy, but without using too many resources. I guess his point was that the service economy makes the world - ie the money - go round without significantly depleting our wonderful planet. I found this interesting and I also like the concept of being able to use the word materialist without any pejorative overtones. One has a lot of time to fret about the future, building a boat.
New Zealand is a magic country, in many ways, and considering our latitude, we get the opportunity of enjoying things that many people have to travel great distances to encounter. We have glaciers; sailing up here in N North Island I have seen Giant Petrels and Sooty Albatross - birds I associate with South Georgia. Equally I can buy locally-grown bananas and avocados, and even sugar cane, should I so desire. Recently, those of us at Norsand had an unexpected treat. A young Leopard Seal decided to pay us a visit.
 Now the last time I recall seeing a Leopard Seal was in the South Orkney Islands, so you could say that this youngster was a bit out of his range. I was quite impressed that all the lads in the yard instantly identified it, until I heard that apparently it had been hauled out on one of the pontoons in the Whangarei Town Basin, to the consternation of the Powers That Be, who had closed the pontoon off so that people wouldn't get hurt. The media had enjoyed the story.
 To be fair, it was but a baby - no more than 6 ft long, but it has to be said that even at this age its teeth were pretty impressive. For sure, the yard cats were sensible in keeping well away from it. And even the slipway team was a little reluctant to shoo it away when they needed to use the slip. They resorted to turning a hose on it, but it seemed thoroughly to enjoy the fresh water all over it, its smile getting bigger as it was sprayed. Finally the pressure was turned up high enough that it decided that this was no longer fun and, somewhat reluctantly, abandoned its sunbathing and swam away. Sadly, it hasn't returned. But what a privilege to get a visit from one of these magnificent animals.
BACK TO BOATBUILDING
OK, now where were we? Well, actually, 'we've' taken a week off to go and visit my old friends Katie and Maurice in Nelson. I love Nelson - such a lovely little city, with a view of the snow-topped mountains (a little had just fallen when the plane landed!) and lapped by the waters of Tasman Bay. Compact, with lovely parks, bookshops, galleries, restaurants, a waterfront and a river. What more could anyone wish for? Well, some better cruising nearby, which is why I'm based in Northland. But if I weren't a sailor, I'd be in Nelson, or possibly nearby Motueka (Mot to its friends), where I went by bus to visit the Tiddles. So great to catch up with friends and more than worth abandoning my labours to do so. I also got to see what Pirate Pearl is up to and had lunch with Dennis, catching up on all the goss. Thank you, all of you, for making me feel so welcome.
Then it was back to the shed and work.
 In my absence, my new stove had arrived. No window, admittedly, but the price was right and it looks well made. I'm rapt with it. I may even go and buy some nice yellow, heatproof paint to pick out the lovely little flower. By the way, the stove is dark green - it's not just the photo. Isn't it sweet? I can't wait to have it lit, with a kettle or - better - a jug of mulled wine on top. However, it will be a while yet, before I get to enjoy that experience.
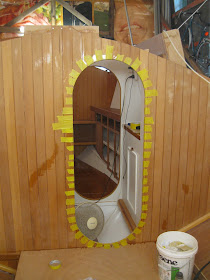
 In the meantime, I've been carrying on in the forecabin, making the doors. Badger doors. Why not? I liked them and I know how to make them. Moreover they are very lightweight. For those interested, I assembled them in the locker framing itself, edge gluing the four corners with PVA. (I used PVA because if a bit dribbled unnoticed, the wood wouldn't be stuck forever.) Then I gingerly removed them - PVA isn't that good a glue - and putting them in a wood vice, dowelled each corner, again with PVA, which is good in this job. Once it had set, they could be routed for panelling. The panels are cut from kauri, chamfered to look like T&G and put into a rabbet that is routed round the back edge.
 Then both sides of the door are coated with neat epoxy, ensuring that it penetrates any gaps in the joints and between the panels. The finished door is astonishingly stiff. I don't recommend putting your hand against the panels to stop you falling, but they are well strong enough for normal use and abuse.
 Finally, with the doors ready, it's time to make the drawer fronts, so now I could glue down the counter top. It fits quite nicely and judicious use of a full gas cylinder and the vacuum cleaner along the outer edge, made for a good 'squodge' of glue, to use a technical term. (Lugging the gas cylinder up the ladder was a timely reminder of one of the many reasons I don't want to cook on gas!)
To finish the forecabin I 'only' need to make a fiddle on the counter, make the drawer fronts, fit the doors, make some bookshelves, and cap the bunk side. Oh, and varnish it all. I also need to finish the cabin sole, but can't do that until the tabernacle is in. There are four portholes to fit, too. There's still a bit of a way to go before I can move on.
I heard a programme on the radio recently where the interviewee was pointing out the difference between being a materialist and being a consumer. They are, in fact, antithetical because a materialist loves things and a consumer loves buying things. So, a materialist hangs on to her beloved 10-year old boots, a consumer dumps them for new ones. Materialists cherish their possessions, consumers only enjoy their newness. His point was that we need to appreciate the difference so that we can live in a prosperous world, with a lively economy, but without using too many resources. I guess his point was that the service economy makes the world - ie the money - go round without significantly depleting our wonderful planet. I found this interesting and I also like the concept of being able to use the word materialist without any pejorative overtones. One has a lot of time to fret about the future, building a boat.
New Zealand is a magic country, in many ways, and considering our latitude, we get the opportunity of enjoying things that many people have to travel great distances to encounter. We have glaciers; sailing up here in N North Island I have seen Giant Petrels and Sooty Albatross - birds I associate with South Georgia. Equally I can buy locally-grown bananas and avocados, and even sugar cane, should I so desire. Recently, those of us at Norsand had an unexpected treat. A young Leopard Seal decided to pay us a visit.


BACK TO BOATBUILDING
OK, now where were we? Well, actually, 'we've' taken a week off to go and visit my old friends Katie and Maurice in Nelson. I love Nelson - such a lovely little city, with a view of the snow-topped mountains (a little had just fallen when the plane landed!) and lapped by the waters of Tasman Bay. Compact, with lovely parks, bookshops, galleries, restaurants, a waterfront and a river. What more could anyone wish for? Well, some better cruising nearby, which is why I'm based in Northland. But if I weren't a sailor, I'd be in Nelson, or possibly nearby Motueka (Mot to its friends), where I went by bus to visit the Tiddles. So great to catch up with friends and more than worth abandoning my labours to do so. I also got to see what Pirate Pearl is up to and had lunch with Dennis, catching up on all the goss. Thank you, all of you, for making me feel so welcome.
Then it was back to the shed and work.


To finish the forecabin I 'only' need to make a fiddle on the counter, make the drawer fronts, fit the doors, make some bookshelves, and cap the bunk side. Oh, and varnish it all. I also need to finish the cabin sole, but can't do that until the tabernacle is in. There are four portholes to fit, too. There's still a bit of a way to go before I can move on.
05 November, 2017
Forecabin fitout
For me, fitting out the boat is the best bit of the building. If I make a mess of it, it's not a catastrophe, like it would be if I made a mess of the rudder or mast. It also feels creative and I like using my mind to think about what is needed in the way of accommodation for me, trying to think what will go where, and what spaces are needed. No doubt I shall forget several things on the way, but that's only to be expected.
 Making the little shelf to go over the bunk was quite straightforward, but I was a little surprised at how extremely curved it turned out to be. Fortunately I managed to find a piece of flexible wood that would take the bend. I'm not exactly sure what it is, not kauri, but similar enough that it won't 'shout at you'. The clamps couldn't get a very strong grip on 6mm plywood, but the epoxy did the job. Wonderful stuff.
 Having painted the shelves for the big locker, I could then start to fit them. The lower one was pretty straightforward, glued to the runners and then with a large fillet to the hull. It had to be propped from underneath, because even with the fiddle, it had a strong tendency to droop. The gap outboard, ended up wider than anticipated, but once the epoxy had set up, it was very solid.
 Then I fitted the little shelf. I used a router to slot the supports for it. With a fiddle inboard and a wide stringer outboard, it will be very well supported. The forward end will be for smaller books, the after end for my morning cuppa. I look forward to sit up in bed, looking at the view, with a cup of Lapsang Souchong,on a winter morning, having lit the fire to warm up the cabin.
 My beautiful tigerwood is being laminated to the counter top. Sawn in two and then planed, it produces a lot of expensive sawdust but the total weight isn't much more than an equally-stiff plywood counter top would be. All these shelves help add stiffness to the hull. I had, at one time, thought of making them removable, but it seemed silly to have dead weight instead of the joinery all adding to the boat's strength.
 The next job was to make the framework for the locker doors. The forward end support on the bulkhead had to be glued in after the shelves and I kept experiencing mild panic that I might glue something in place and then find that I couldn't manoeuvre the shelves into position.
 Bookshelves will go across the forward bulkhead between the bunk and the locker. The 'dead space' outboard will be accessible, with a bit of a wriggle, through the adjacent door. There's so much storage that I doubt much will end up there. A panelled bulkhead fills in under the counter.
 The tigerwood dry-fitted to the counter top. Again, I think plugged holes will look fine and it's a lot easier than trying to clamp these big projects because I don't have the necessary sash clamps.
 The counter top coated and put to one side in readiness. The dark, figured wood contrasts beautifully with the kauri.
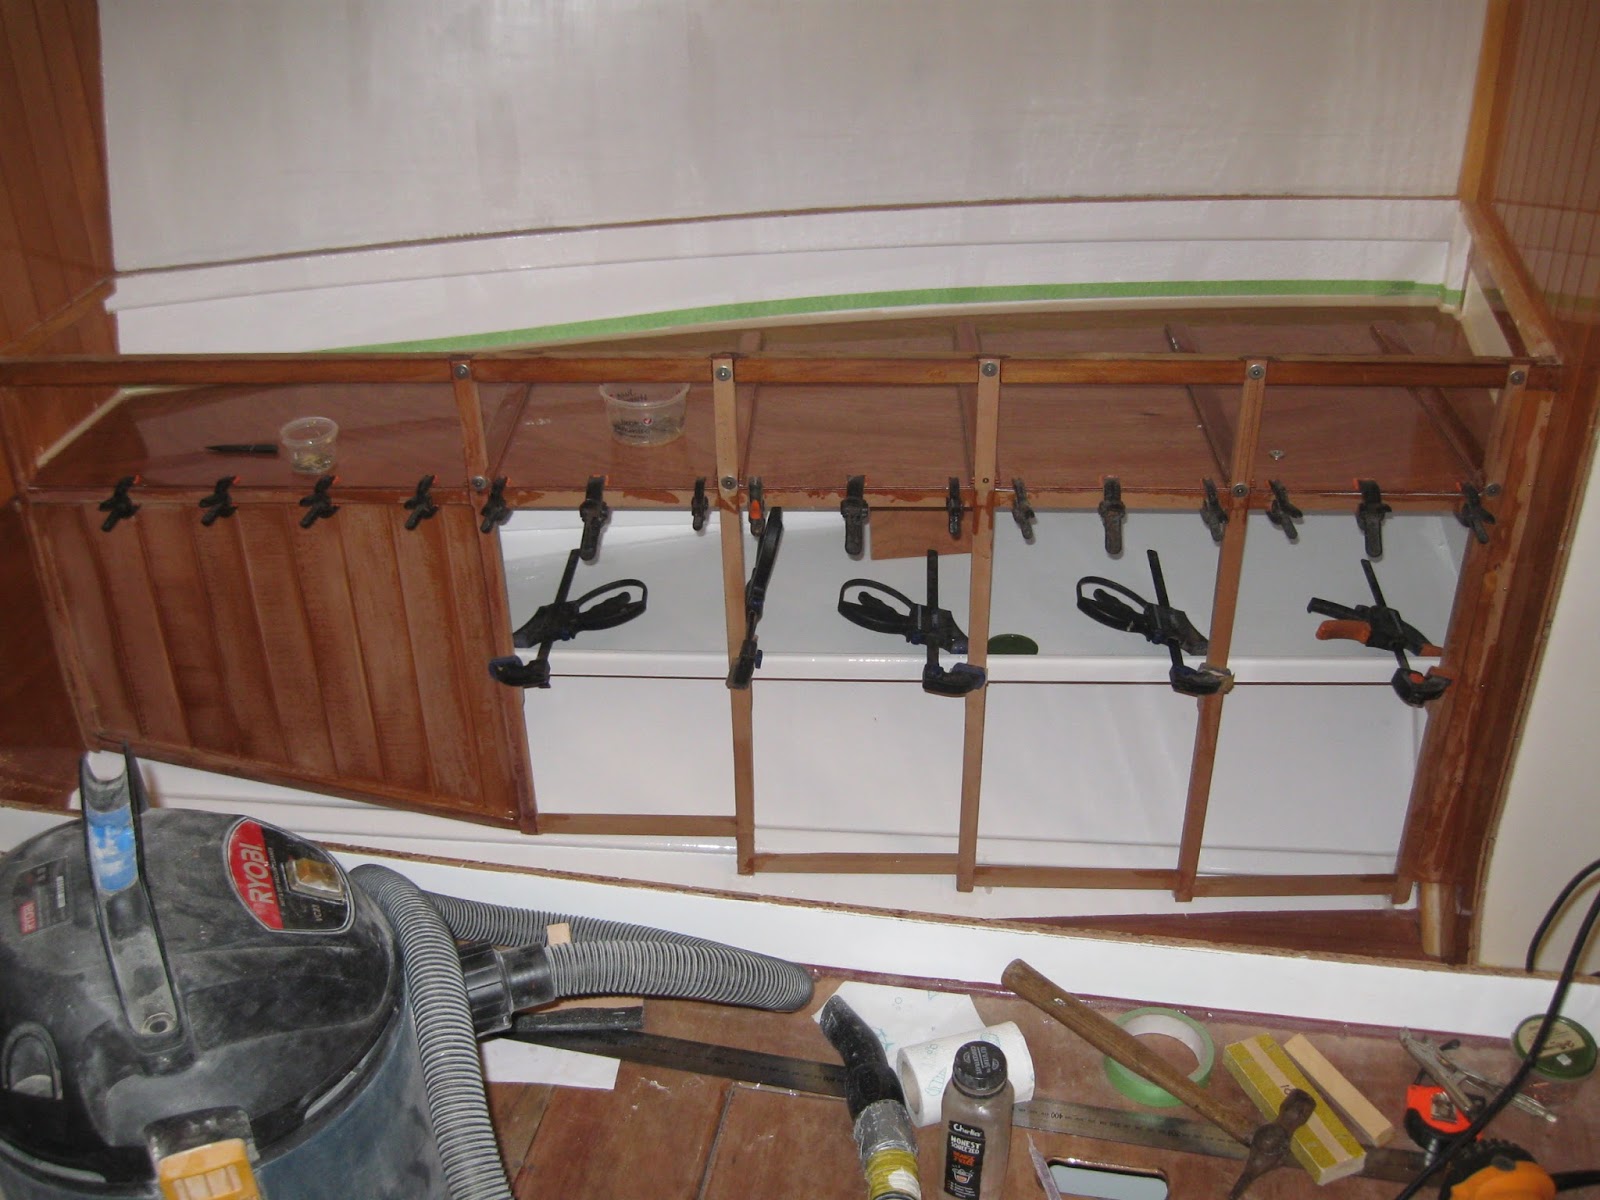
 Gluing in the top shelf. The framework was all put into place, but not yet glued, so that I could get under the shelf the following morning in order to fillet it along its outboard side. I also had to be careful that the framework didn't get glued by mistake!
 Unable to think of any reason why I shouldn't, I then finally glued the whole framework into place. I had attempted to fit the lower frames from the bottom of one stile to the bottom of the next, but soon realised that, especially with a stringer in the way, it was well beyond my capacities. So I fitted them horizontally, arguing that they will allow for a little ventilation.
 Finally, I coated the whole lot with neat resin. (I didn't have quite enough for a second coat on the forward end of the panelling.
Next job: make the doors. (I'm still painting the little shelf, in case you were wondering.)


Next job: make the doors. (I'm still painting the little shelf, in case you were wondering.)
22 October, 2017
Smaller pieces of plywood
Having started to make the forecabin locker so that I could put in the big piece of plywood, it became obvious, that underneath would be more pieces of plywood, which would be a lot easier to glue in from the bottom up.


Although you won't be able to see the bit of panelling, I will, when I go rummaging into the depths of that locker, so it has to be masked off. (I believe this is known as Compulsive-Obsessive Disorder.)


So, back to the paint brush.
08 October, 2017
Big sheets of plywood
One day, I'll fit the deck beams - promise. In the meantime, I'm still fooling around with big sheets of plywood that need to be fitted before that happens.
 I can't decide, in advance, exactly where the hatches are going to be installed in the saloon/galley cabin sole, or even if I'm going to install hatches at all. I may just divide the plywood into manageable pieces. My water containers are going to live under the forward part, so I do need to be able to get under it regularly. That being so, I 'lofted' the shape and planed a bevel on it. I tried fitting it three times, but it was too big, and by the third attempt my back was complaining. (It's almost a full sheet and needs lugging up the scaffolding and then - gently - placing down inside. My hands aren't strong enough to grip a sheet and lift it, so I decided to wait until Marcus was around to give me a hand!

Still, I could fit the other big piece of plywood. I'd cut out the athwartships framing for the forecabin locker ages ago and now fitted a kauri fore-and aft frame. Taking a leaf out of Badger's book, I butted the joints and dowelled them after the event. A good way of making strong joints for bodgers.
 I've finally managed to get my head around a 'tick stick'. I've read
about it dozens of times, but always by people who assume you know what
they're talking about. Well I didn't. However, I've recently discovered
a site for DIY boatbuilders. Most of the posts are quite irrelevant to
me, but there are some little gems, including one that told me all
about how to make and use a 'tick stick' . So I followed the instructions.
I've finally managed to get my head around a 'tick stick'. I've read
about it dozens of times, but always by people who assume you know what
they're talking about. Well I didn't. However, I've recently discovered
a site for DIY boatbuilders. Most of the posts are quite irrelevant to
me, but there are some little gems, including one that told me all
about how to make and use a 'tick stick' . So I followed the instructions.
 The thing that makes this 'tick stick' work for complete amateurs, is that you cut out a series of notches in the wood and include these in your locating marks. The notches all being different, it makes it easy to be sure you've got you stick back in the right place. (If you want to know more about the process, please follow the link above. It's explained far better than I can!)
 I marked out the plywood and then cut it conservatively before
offering it up. I also checked the measurements from the framework, by
measuring. By the time it was trimmed to fit, I was very impressed
with the 'tick stick' method. I could have trusted my original markings
and cut it accurately. Before I could do any more on it, I needed to
flocoat the underside ready for paint. You don't need a photo of that.
I marked out the plywood and then cut it conservatively before
offering it up. I also checked the measurements from the framework, by
measuring. By the time it was trimmed to fit, I was very impressed
with the 'tick stick' method. I could have trusted my original markings
and cut it accurately. Before I could do any more on it, I needed to
flocoat the underside ready for paint. You don't need a photo of that.
 It occurred to me that before I struggle once again to fit the cabin sole, it would be wise to put some extra framing in place, first. This was all cut to length, notched and then glued into place.
 Then the corners were filleted - the outboard ends of the bearers had already been filleted into place. I considered whether or not to paint it all, but decided it would be a lot quicker simply to put one thick coat of epoxy over all the bilge area up to the first stringer. There will be light enough to find my water containers and anything that is stored aft. Great stuff, epoxy, for making things look good!


Still, I could fit the other big piece of plywood. I'd cut out the athwartships framing for the forecabin locker ages ago and now fitted a kauri fore-and aft frame. Taking a leaf out of Badger's book, I butted the joints and dowelled them after the event. A good way of making strong joints for bodgers.

 The thing that makes this 'tick stick' work for complete amateurs, is that you cut out a series of notches in the wood and include these in your locating marks. The notches all being different, it makes it easy to be sure you've got you stick back in the right place. (If you want to know more about the process, please follow the link above. It's explained far better than I can!)

