Well, we've finally made it out of the shed. Those of you who are impatient can scroll down to look. Otherwise, bear with me while I finish off the mast.
I have had more than my share of fatiguing, stainless steel fittings at the masthead. Even 316 "isn't what it used to be" and I have tried to avoid it where possible in this boat. The worst seems to be metal to metal, so I thought to avoid this by using webbing loops instead of eyebolts. Racing yachts use Dyneema for various fittings that used to be made out of metal and the webbing will probably last longer. It has a 500 kg breaking strain, which should be enough for the loads of my rig. The mast should be (relatively) easy to lower so that I can inspect the top, too.
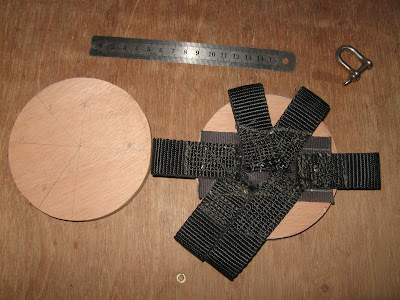
I made loops out of webbing and sewed them to a backing strip and to each other. The double loop is for the two blocks for the halliard. I then sandwiched them between two discs of plywood, which were then glued together. Once the epoxy had cured, I filled in any gaps that were left and painted the whole thing. Epoxy sticks really well to something like this webbing!
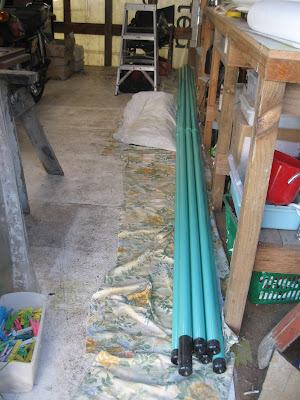
I painted the topmast my 'signature' aqua, like I used for Fantail. In the end, I couldn't resist the temptation and varnished the yard!
The yard and the battens were put safely out of harm's way in Marcus's lean-to at the back of the shed.
I also painted the topmast fitting and attached it with Simson's Marine Glue, leaving the screws in place for extra security for the whole lot. The complicated graffiti is in order to line up the (NASA) tricolour light. (No white light: I think anchor lights should be down at eye level, where people can see them when coming into an anchorage, not way up in the air.) I shall run a string line down from the arrow on the top of the tricolour to the base of the mast and mark the forward face of it before putting it in.
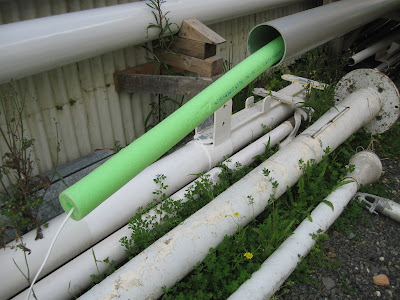
The usual approach to putting wiring down a mast is to use a conduit, but these are made of hard plastic and in order to stop them rattling around in annoying fashion, require attaching to the mast. I don't want to put holes in my mast and conduit isn't cheap. Instead, I have used 'pool noodles', which should make a gentle swishing noise, rather than a 'clang, clang' and with luck, will not even be audible from inside the boat. I brought the two parts of the mast close together, hauled the wire down with a mouse and then shoved up the pool noodles from the bottom of the mast.
Gordon, who has been having to travel back and forth to Auckland, was roped in again, for joining the two parts together.
We carefully levelled and aligned the two parts and used plastic tubing as rollers. Gordon held the topmast, I pushed on the lower one, and they went together very nicely, with a satisfying excess of glue squirting out. I chose a flexible glue over epoxy, because the wood and the alloy may well move very differently as temperatures fluctuate. The sun can be pretty fierce in Aotearoa and on a calm day, the mast might get quite hot.
With everything in place, we could push the excess pool noodle into place. They seemed to go quite far up the wooden section, in spite of all the dribbles of epoxy inside that part.
Getting the final alignment perfect took a bit of fiddling about, and we had to work quite hard to ensure it was level along its length. I went back later in the day and checked again and put extra glue around into any hairline cracks, which I cleaned up later.
With the boat just about complete, I asked the yard to arrange to pull her out of the shed. Several friends came by to join in the fun and it was a wonderful day.
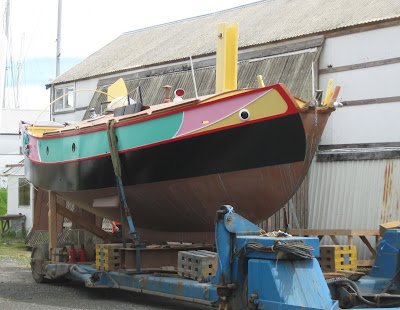
The lower part of the front of the shed has been removed and the doors swung open so that I can finally get a proper view of my boat. Being a Chinese junk she, of course, has eyes on the bow.
The 'tuning fork' trailer was manoeuvred into the shed.
And carefully moved under the cradle.
Then the tractor slowly pulled Fanshi out into the sunshine.
It was incredibly exciting to see her for the first time. She looked remarkably like the image I have had on my phone for several years!
Marcus knows an amazingly talented woodworker, Ricardo, and he got him to carve two dragons and a sun for me, which he gave me for a birthday present. (What a gift!) I also paid Ricardo to make the eyes. They all look fantastic!!
It was great to be able to stand back and actually walk around the whole boat from a distance.
I am dying to know what David will think about his creation, now that he can see her properly.
With the yard full to overflowing with Covid-stranded boats, Fanshi was shoehorned into the space next to the shed where she was built. Now I will have to wait until she's launched to stand back and her in her entirety again.
And I will need to get the name on the stern, too.
A close up of one of the dragons.
And an eye.
And a view of the wonderful bow, which I really love.
And the other dragon.
Finally, a view from Tony's boat, showing the deck, wet with rain. Make the best of it, soon it will weather to grey and never look quite so glorious again!
Now, I need to cover the cushions, make the sail, put the mast in the tabernacle and rig the boat. Then we can take to the water. If I pushed it, I could be ready for Christmas, but have decided to slow down and enjoy this final part of the project. More to the point, I don't want to be sailing my unknown boat and finding out how she behaves at anchor over the holiday period, when there are boats everywhere and all the anchorages are full. There's no hurry. I can sit out in the sunshine once more.


Congratulations, Annie! That's a huge milestone. And Fanshi looks gorgeous!
ReplyDeleteCongratulations!!! She looks amazing ��
ReplyDeleteWell done! Fanshi is beautiful!
ReplyDeleteWow! Great job!!! I remember hearing about you years ago from friends who junk rigged their boat. I have a 26ft gaff rigged yacht. I liveaboard in the Marlborough Sounds. I had it built in 2005. Will maybe be up north in March. You may have launched by then!
ReplyDeleteMagnificent!
ReplyDeleteI amm hoping to launch in the middle of January. I shall look out for a nice little gaffer, of a similar size to Fanshi. It would be fun to meet. If you want to leave contact details on this comments section, I can note them down without publishing them - I always moderate the comments first.
ReplyDeleteGood lord! How on earth have I ended up on Facebook?
ReplyDeleteYes, indeed I have a tabernacle. No, there is no drawing, but there are pretty extensive photos. It should be tagged on my blog, otherwise just search tabernacle. Yes, it is seated on the keel and the mast then stands in the area above deck. No shrouds or stays - one of the best things about junk rig is saving the cost, weight, worry and inconvenience of all those wires! Just because your vessel is large, doesn't mean that you can't have tabernacles - after all the big Chinese junks had them - but they do need to be keel stepped. Being able to drop the mast at will is a big bonus.
Thank you all for your kind comments. I am so pleased with how my little boat has turned out and it's nice to know that other people are enjoying her, too.
ReplyDeleteWell done Annie - she looks fabulous! I can absolutely understand the desire not to rush, there's a very abrupt transition from design and planning to reality, but I can't wait to see her rigged!
ReplyDeleteMalcolm D
Wnderful! I bought your book SOASI years ago and read that you were going to build this boat and now here it is!⛵
ReplyDeleteI bought your book VOASI and then read you were building this boat. And here it is, WONDERFUL!⛵
ReplyDeleteOh how beautiful Annie. Fanshi brings tears to the eye. Hugs. X
ReplyDeleteI had reservations about how the bow would look, but better than i thought it might! Those dragons are super wonderfull. Awesome job, well done and you should be proud of your work!
ReplyDeleteLooking beautiful - well done!!
ReplyDeleteCongratulations to you Annie on your achievement, Fanshi looks great out in the open in all her glory.
ReplyDeleteI've been a fan since I first read SOASI, and then I found this blog.
I remember seeing Fantail cruising the Marlborough Sounds however I never got a chance to say hello.
Hopefully we'll see you and your new beauty down here again sometime