Well, I've just about finished the interior, apart from ... and ... and ... However:
enough! Time to move on.
Trimming around the forehatch was not something I was looking forward to. I wasn't at all sure that the opening was absolutely square (it wasn't) and the 'frame' involved mitres, something I dread, in spite of having a drop saw that purportedly cuts them perfectly. To do the job, I had to go and find a bit more kauri cladding, remove staples and nails, burn off the paint, trim the tongues and grooves, send it through the thicknesser and then saw it to an appropriate width. And people wonder why things take so long!

Once the framing was fitted, I then had to line the inside. The hatch corners are radiused and I experimented with making radiused pieces of wood using a hole saw, but once I had my dinky piece of wood, I then had to alter the 90° piece of wood to 89° or 91° or whatever my 'right angle' happened to be, otherwise it stood out like a sore thumb. Finally, I decided that it was more trouble than it's worth, because with the lining in place, you can only see about 5mm of hatch radius and I can live with staring at that, should I be lying awake in daylight.
The lining is in place and the plugs filling the holes; and I think it looks fine. All those who have been deluding themselves that I'm a perfectionist can now allow me back into the human race!
And here it is all varnished up. The beauty of the old kauri never ceases to gratify me. It is also slightly awe-inspiring (and a tad depressing) to think that the tree it came from could easily have been 1,000 years old.
Securing the cooker wasn't as straightforward as it might have been. There was nothing obviously to fasten to, so in the end I resorted to crude but effective: drill some holes in the side and insert a couple of barrel bolts.
And while I was at it, I made spacers for my nice china mugs. I shall fit some method of holding them down, so that they (and the cooker, of course) stay in place when the boat is upside down. Unfortunately, due to what could kindly be called a design fault, the pan supports on the cooker can only be removed for cleaning once, after which they are loose, because the plastic foot to stop them from rattling breaks upon being removed, so
they will fly around the cabin.
However, the little alcohol cooker (yet another gift from David Tyler) looks pretty natty in place and the bolts hold it down in an impressively solid manner.
All this time I had been picking away at the trim for the deckhead. Before I could do anything, I had to fit the quadrants fore and aft, because they have to be forced into place against the camber.
Then I fitted all the fore and aft pieces, and joggled the short lengths athwartships around them.
In truth I really anticipated breaking at least one of them (the carnage in the forecabin left me permanently traumatised), but they were surprisingly amenable and the job went without too much bad language.
An attractive optical illusion comes from the curved centre section meeting the straight side pieces: it look for all the world like a slight S curve, which I find very appealing.
This is the best I could do to get the overall effect. Small boats don't offer very good opportunities for great interior shots.
I have to say I am very, very relieved to get this trim up. The deckhead looked like ... well, it looked bloody awful with all the gaps showing between the headliner panels. Now it looks very presentable and all the wood breaks up what would be a vast area of white into attractive sections.
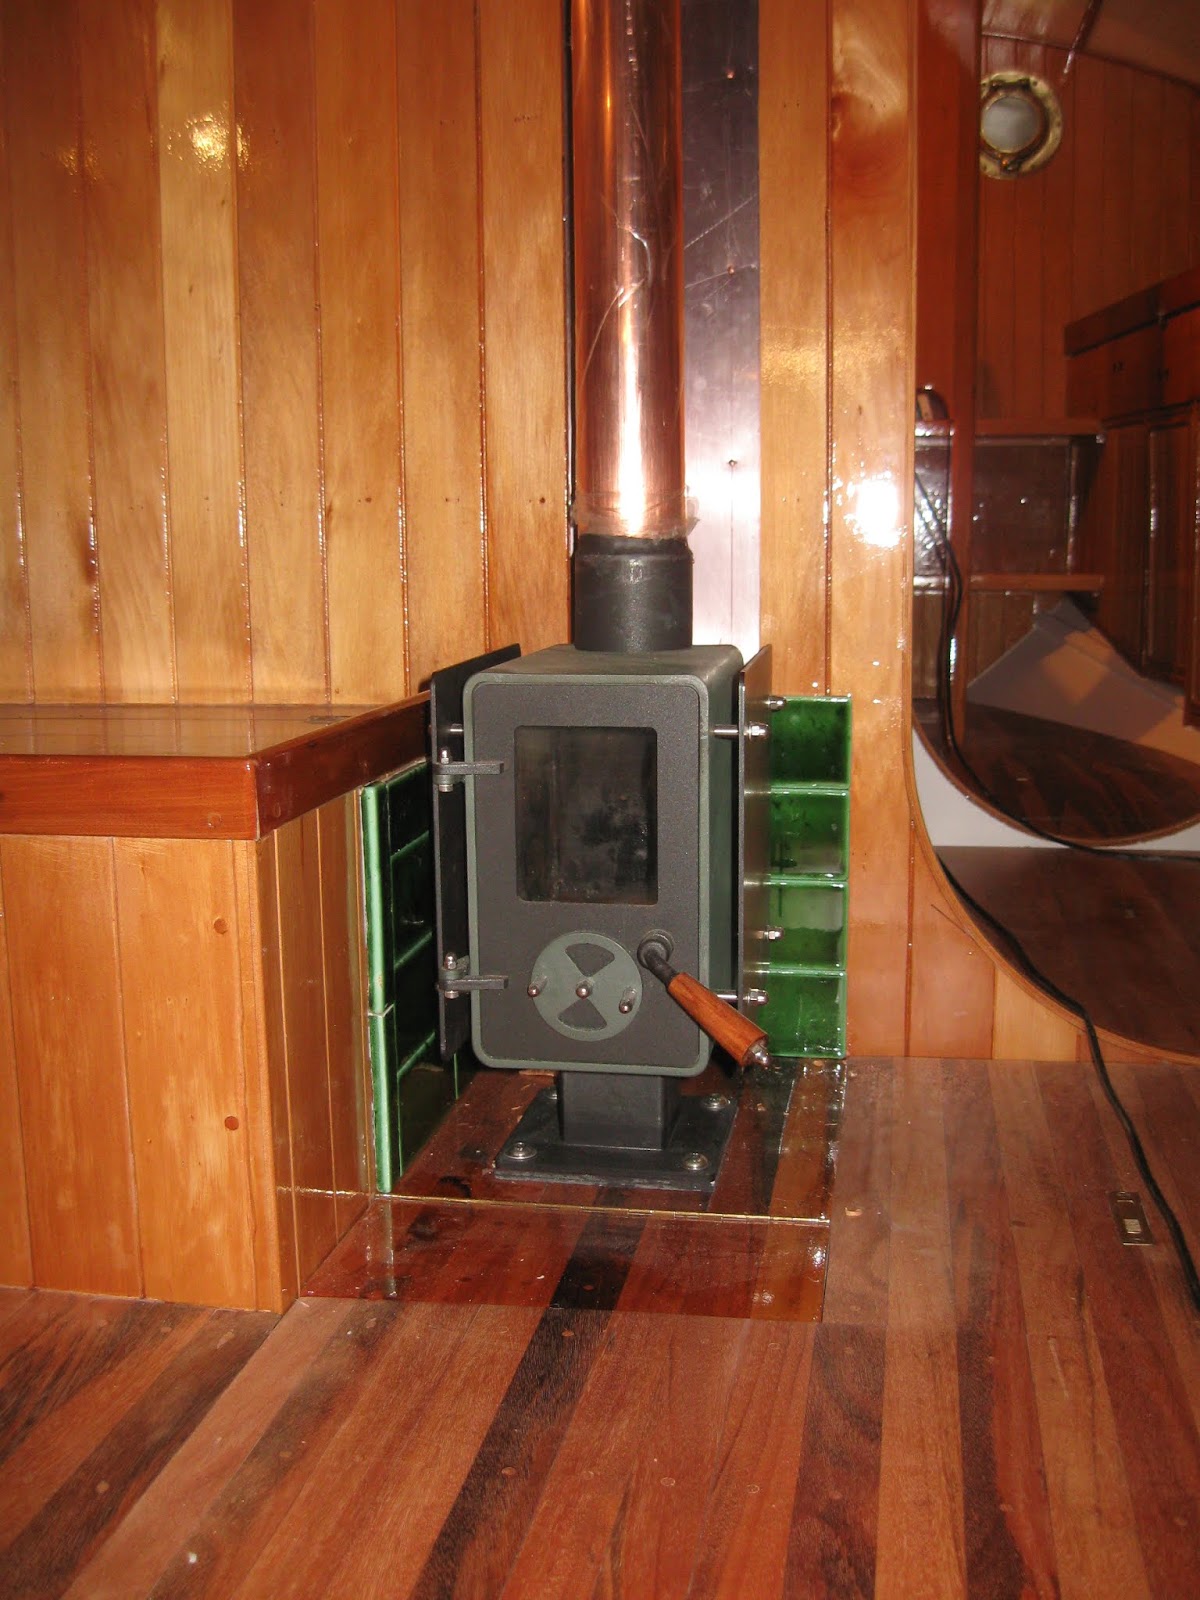
Oooh! The little Flick! Isn't it just too gorgeous for words? I'm so pleased with it and can't wait to light it - I hope next winter! The green tiles around it are hand-made from Spain. When you are buying fewer than 20, it doesn't really matter what they cost, but I must say it adds to my conviction that small boats are a Good Idea, if you have expensive tastes like I do.
The cockpit beckons and, to be honest, I'm a bit scared of it. David and I planned it all out in detail and I'm sure we got it right, but ...
So in order to ease myself into it, I smoothed out stern where the outboard bracket will be fitted. The three layers had been pretty rough since fitted.
Then I set to fairing the final scarf, which was, in fact, the first one I ever did. I faired up the one on the other side months (probably years!) ago and it looks perfect, so I hope I can do as well with this one.
Meantime I've been gradually fairing the surround for the galley hatch. Again I have the radii to deal with, but this time I don't want any framing. I think it will look too busy and anyway, I'll bang my head on it. Headroom is somewhat constrained here, so I'll just keep adding thin layers of fairing and sanding it, until it's fit to be painted.
The first thing to do in the cockpit proper was to set up the framing for the bridgedeck, that I took out when I started building the interior. As it happens, it was about 40mm or so too low anyway. I've decided to put the bridge deck horizontal, but put a slope on the deck outboard, to help shed water.
This is the panel I removed and before putting it back in, I cut the bottom to match the camber of the deck and allow slightly easier access into the space under the cockpit. I glued some thin veneers of kauri along its edge to finish it off.
At
last - she has moved into the cockpit and glued some wood in place!! And the first thing I did was
to erect a keep-out barrier to prove that I mean business. In fact this
is the last
major construction job, although neither building
the bilge boards nor the mast are that minor! Still, it feels good to
get going on it.
And this is the view from the inside, looking out. The bridgedeck will land on the panelled bulkhead.