Search This Blog

Badger

Badger
In Greenland

Iron Bark

Iron Bark
Under full sail

Fantail

Fantail
At Russell Boating Club's Tall Ships Regatta

Blue Water Medal

Blue Water Medal
Blue Water Medal

Books By Annie Hill

  • Brazil and Beyond
  • Voyaging on a Small Income
Showing posts with label Classic Marine. Show all posts

30 June, 2019

Just a few little jobs

I wonder if it's just me, or does everybody find that "I'll just do this ..." jobs are the ones that take forever.  Its seems to be the silliest little jobs that take the longest.

While I was laying the deck, the intention had been to 'pop' down below and finish off all those little jobs that hadn't been done, while I was waiting for glue to dry.  Great idea, but failed in practice because there were always so many other things to do while the glue was drying.  No worries, I said to myself, I'll just knock them over and get on with the cockpit.  That was three weeks ago and last week I wrote out the list of what still needs to be done.  I don't think I'll be starting the cockpit next week, either.  I seem to have spent half of the past few weeks going in an out of Whangarei looking for bits and pieces.  Most of what I've been doing is hardly worth photographing (finishing the wiring to a 12 volt plug in the saloon, which involved trying to find decent cable clips - Paul at All Marine ended up giving me some nice copper ones he had left over from one of his jobs; cutting hose for the 'plumbing' to exactly the right length, etc, etc,)  However, there are one or two photos that might be of interest, so it's probably worth writing my blog today.

 Many moons ago, I tried to purchase the most wonderful little woodburner, only to find it was no longer in production.  So I bought Raoul's Flick which was almost as nice, but was black all over.  I like a bit of colour and as the poor wee thing was a bit scratched from having been ordered long before it was required, I decided to paint it in two colours.  So part of it is a sort of dark sage colour and the rest is black.  It looks pretty good, actually, but more so in the flesh than in the photo.

 However, when reading the instructions (yes, I do!) I saw that they suggested firing it up before installing it, because the paint has to be 'seasoned', so to speak, like a good frying pan.  What fun!  I've been desperate for an excuse to see how it goes.

 Well, as you can see, it goes very well indeed.  It was the easiest thing to light and went off like a little rocket.  The damper is just amazing: close it off and the fire almost goes out, open it a wee crack and it comes back to life: wide open and you have a little blast furnace going.  As so many people have told me that I'm installing the fire all wrong, it's nice to know that I can shut if off so effectively.  It should reassure them.  Anyway, I left the damper wide open and sure enough, once the stove had got good and hot, I could see fumes rising from the surface.  I just hope it was hot enough for long enough.

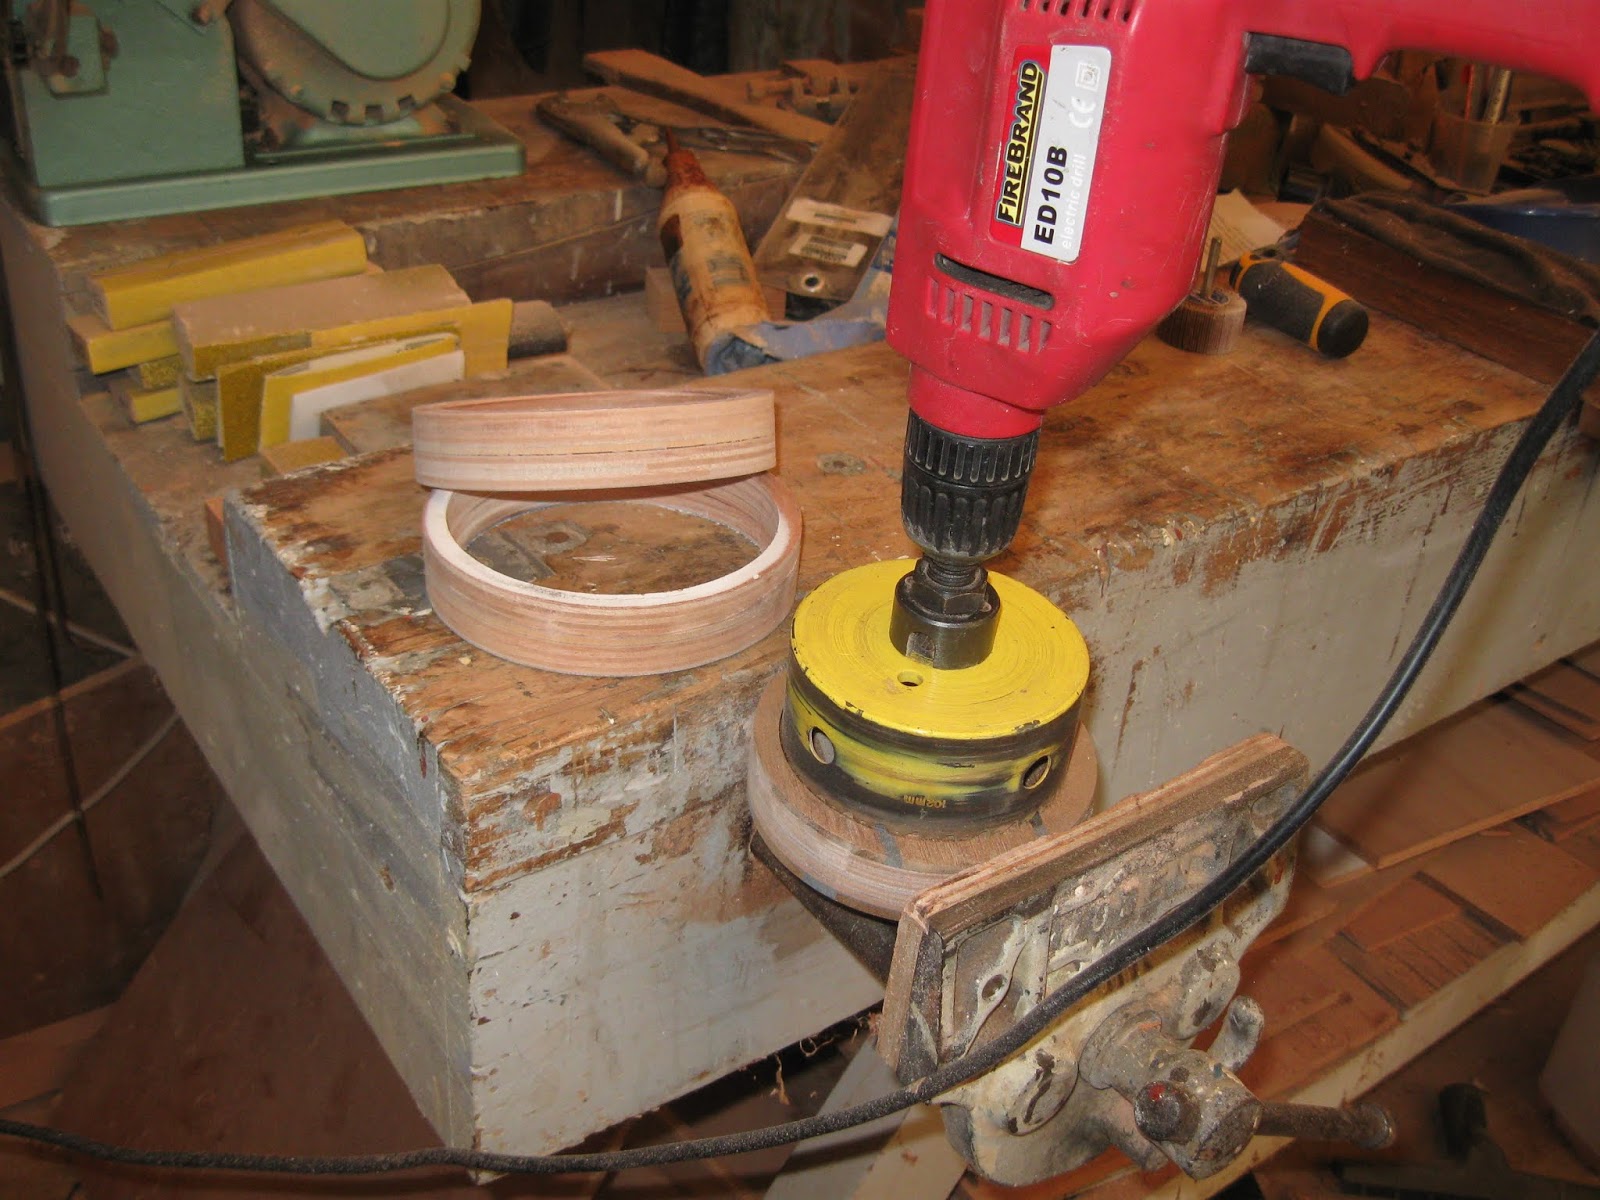
 A lifetime of being short of cash has made me somewhat chary of throwing things out and sometimes this pays off.  Again, many moons have passed since I cut out the holes for the port holes, but I couldn't bring myself to throw them away, so stacked them under the bench.  Well, I had cut out two 127 mm holes in my deck (for the decklight and chimney) and needed spacers around these holes between the headliner and the deck.  Not only were my cutouts the ideal size, but the hole up the middle allowed me align them perfectly.

 I then took the 127mm hole saw (thank you, Norsand) and cut out the correct size hole.  Clever, eh?

 In the meantime, I had got out varnish for some reason, so could put some on the brass and finally fit the remaining portholes.  (Or starboard holes as one wag would put it.)  Finally, they are all in.  You might think it's extremely idle of me to try and put off polishing these.  Correct.

 Neurotic as I am about leaks and rot, I did the WEST thing on the machine screws for the chimney.  The red thing in the background is (inexplicably) known as a chimney jack and is of a very special silicone rubber that is supposed to tolerate a higher temperature than is normally the case.  It comes in red, red or red, to differentiate if from the less heat-resistant type of  'jack'.  I dare say I can live with it.  The best thing I can see with it is that it can move up and down with the chimney, as it expands and contracts.  From past experience, the vertical component of this can be disconcerting to say the least.

 This is one of the holes in the deck.  I think the one for the chimney, but they all looked much the same.

 And here I am fitting the Air-only ventilator that goes in the heads.  They are complicated things to fit, and being somewhat dumb about these things, I had to print out the instructions to ensure that nothing was forgotten.

Having fitted it, I am entirely convinced that it will keep the water out (watch this video if you want to be reassured); however, I'm not entirely convinced that it will let any air in!!

 Still, it looks very seamanlike on deck, next to my lovely little decklight.  (Davey's via Classic Marine)

 These chimney jacks are a wonderfully snug fit, but my copper downspout (yes, I know it will probably melt) has a seam on the back.  I had to go and buy some bolts for it from Steelmasters because the ones that came with the jack were (a) magnetic stainless and (b) the wrong length.  While I was there I saw they had this (apparently) magic silicone tape, which bonds to itself and is very heat resistant.  I could press it into the seam, and rolled up a couple of little sausages of the tape to put on either side.  I hope it works!

And finally, I have just about got all the trim cut and fitted.  These fiddly little bits of wood are enough to drive me into a nervous decline.  Dry fitted, they certainly made a big difference, however.  Once they are all varnished they should finish off the deckhead very neatly.


03 February, 2019

Finally I get to varnish!


I have been working really hard on the boat these last few weeks, well aware that Time is Going By and that everyone else is off sailing while I'm still in a boat shed.  This has meant that my Sundays 'off' have been more than usually busy, plus of course there was the Tall Ships Regatta.  All this is to explain why I haven't blogged for a while.  So lots of pics today to make up for it.

 I may have already mentioned these natty little floor rings from Classic Marine.  There is still a wee bit of space for dust to get into the bilges around them, but they are the best that I've seen and feel robust when you use them to lift up the sole.  They don't hold the boards down of course.  If I go offshore, I'll probably simply put screws in for the passage.

 Making the cabin sole is definitely one of the 'lolly jobs' and I am so pleased with the end result.  The tigerwood sands to a beautifully, satiny finish that feels lovely under one's bare feet.

 Another lolly job - and a rather scary one - is making the saloon table.  Many boats have tables that are works of art.  A friend has just told me how she inlaid hers, but I don't have that level of skill, so am keeping it very simple.  I had made a 'pattern' out of MDF and scrap plywood to test out the idea.  Because of the fore and aft bulkhead next to the dinette, the table needs to be able to slide so that one can get access.

The table is designed to fold, but instead of the leaf folding down, it will fold up and lie on top of the other one.  This avoids the irritating business of everyone having somehow to remove their knees when you want to extend the table.  It also gives more leg room when the leaf is up.

 I agonised for ages over the height of the table, and finally got my friend, Alan, to sit at it.  I had a moment of cold panic - it was only just high enough and I'd thought of knocking off another 50mm to suit me!  As I would like my friends to be able to be comfortable, I have compromised.  Of course, the definition of compromise is that no-one is happy!  This photo also show the table top slightly off centre - slid to one side.

 I then glued two pieces of tigerwood together to make substantial feet, for bolting the table down.  I cut them to a shape that I hope will avoid toe stubbing.

 Oh no!  More hinges and they caused me just as much grief as all the others.  Somewhere in my brain the synapses fail where hinges are concerned.  I hate fitting them with a passion!

 But they do look rather nice.  As long as you don't look too closely.

 Meanwhile, I've been working on the headliner, cutting the plywood, fitting the pieces, coating it, painting it and finally gluing it up.  Two more pieces are waiting to go in, but I decided to leave them off until I'd done the varnish.

 So while glue is setting on the table and paint is drying on the headliner, I may as well complete closing in the boat by laying the decks.  As you can see, even 6mm ply doesn't exactly flop over the camber.

 I had plenty to screw to at the forward end, with all the reinforcing for the mast.  It was good to start off with a fairly straightforward piece.

 However, the next piece presented rather more of a challenge, requiring far more screws than I'd originally anticipated.  Even my vast weight on the edge of the panel only just persuaded it to bend.


 And the matching one on the other side.  Gluing things down in temperatures of over 35ºC is not a lot of fun, even with super slow hardener, and can get a little stressful.  Thank heavens for battery screwdrivers!

 The next panel has to go between the bilge board cases: I'm still working out exactly how to cut them down.  The original idea was to hang the control blocks from them, but I have visions of some large person slipping and landing with all their weight on the 12mm plywood, breaking it off.  So I think I'll trim them flush and invest in some stand-up blocks to take the lines.

 When I dry fitted the panels, I discovered that once forced into place on the camber, they formed hollows on the fore and aft line.  I don't quite understand this.  I'm hardly 'torturing' the ply, because the deck is horizontal (more or less!) from bow to stern.  However, mine not to reason why, so I put battens along the prevent it happening.

 Before gluing the panels in place, I put down some insulation material, more to prevent condensation than anything else.

 Then I had another session with recalcitrant plywood, trying to get it to bend as I wanted.  It would have been a lot easier if I could have done it in one piece, but the bilge board cases prevent that and I didn't want to cut them off at this stage.

 I doubt you can actually see it in the photo, but in spite of my best effort - and the batten, the panel still has a bit of a hollow.  By the time I have another layer of (4mm) ply and the teak on, I hope it will have smoothed itself out.  Anyway, it will keep out the water and strengthen the boat, which is its major purpose in life.

 I find people's attitude to the camber a bit of a puzzle.  When the boat is heeling, you can walk on the weather deck and have a pretty level area to move along.  When the boat is upright, you can walk along the centre line (sail permitting).  I don't see the issue myself, but the camber draws a lot of negative comment.

 I am leaving the stove installation right to the end.  I've put a few tiles in place behind it.  They don't really do much, but they look nice.  Supposedly you are meant to leave miles of space around a heater, but I've lived with many and I doubt any of them complied.  The one I'm fitting has good heat shields and will be 100mm from 'combustible surfaces'.  I don't think it will set fire to the boat, as long as I don't crank it up too far!  And as I only have a small space to heat, I'm unlikely to do that.

Finally, I could get down to one of my favourite jobs, varnishing this lovely wood.  Masking tape was required around the white paint, which is only a semi gloss finish.


 I put three coats on the areas that will get hard wear, two coats everywhere else. If only paint were so forgiving!

 I varnished under where the heater will be.  It's much easier to remove the dust from a shiny surface!  The varnish really picks out the grain in the wood - the strange mark on the kauri to the left of the passageway is in fact a golden whorl of wood that literally glows.  It's quite beautiful.

 I like the contrast of the tigerwood and the kauri.

 And the little locker doors all look rather sweet now that they are varnished.

And I've treated myself to two lovely brass, pumps for the galley.  I am so pleased with the way my sink has worked out.  Large enough to wash my biggest pot in, but small enough that I can use fresh water to do so.

So back to the decks. 

18 March, 2018

In the forecabin again

With the tabernacle in place, I can now think of getting the deck liner in.  This will help keep the forecabin clean and allow me to fit out the saloon, with a certain knowledge of where I have full headroom.

 Please forgive the quality of this shot.  It was the only one I took showing the dowelling put into the deck beams, through to the beam shelf/sheer clamp - whatever the correct word is.  While I am fairly sure of my glue joints, adding 'trenails' gives me an increased confidence in them.

 My next job was certainly what is known in this country as a 'lolly job': fitting the cabin sole.  Once again I milled up a heap of tigerwood and planed it down to about 5mm.  I worked out how many square metres were required and prepared that much timber, to be sure that it was all the same thickness.  In fact, I ended up sailing a little bit close to the wind, but just had enough.

 There are two lifting hatches in the forecabin and I indulged myself in buying some natty little brass rings from Classic Marine to help in lifting them up.  Thus far, there is no way to secure these hatches, but if I went offshore, I would have to screw them down, or find some locking device.  I was very pleased with the looks of the floor, once it was all sanded.  The paint and varnish now require touching up, of course, but I expected that.  Indeed, I only put a couple of coats of varnish on the side of the bunk, in anticipation of needing to do it again.

The unstayed mast puts quite severe loads on to the deck structure.  Because there is minimal framing in the boat, and there are no hanging knees, I am going to stiffen up the deck with some more layers of plywood.  Two layers of 6mm ply will run fore and aft on either side of the tabernacle (and in front of and behind it) and a further small deckbeam will be fitted abaft the tabernacle to allow for the same thickness of plywood to be carried out to the sides.


17 September, 2017

Finally, I can tick off the heads

Heaven knows, it's taken long enough.  I will offer the usual excuses of slow execution, much head scratching, one or two steps backwards and all those coats of paint, but finally, I've have completed the fit out in the heads compartment.  Which, let us not forget, included making the composting toilet, which took more googling and tooth sucking than actual work, it has to be said.

It is surprisingly difficult to get bronze fastenings any more.  No chandler had what I wanted, I tried emailing a company in NZ, but they never replied, and Jamestown Distributors, who advertise in Wooden Boat magazine, also failed to respond to my requests for information.  In the end, as I've already mentioned, I went to Classic Marine, who gave me their usual excellent service.
 
As well as the fastenings for the portholes, I'd ordered turnbuttons and 'automatic buttons', made by Daveys.  I love these natty little things, and they make strong catches.  The ones Daveys make come with a wee bush that keeps them away from the frame so that they swing easily.

Here are the doors, finally fitted in the starboard shelving.  As you can see, the frames protrude

so I made little bosses for them to sit on.  To do this I used a 44mm holesaw and cut them out of tiger wood.  They were cut in two just under the screw hole and then glued onto the framework just above the door.

On the port side is the locker which will hold my brewing barrel.  Although this will be stowed at the forward end, I decided to fit an 'automatic button' here in case the barrel works its way aft and leans against the door.  (The brass door fittings can be seen in a later photo.)

The next job was to fit the finishing wood on the cabin sole.  For this I used the tigerwood, sawn into 6mm veneer, 40mm wide.  It stiffens up the 12mm ply to at least as stiff as the 18mm most people would use.  I made, fitted and finished sanding it over four days, which I think is a reasonable investment of time for something that will require no more maintenance than the occasional clean.

I decided simply to use temporary screws and plug the holes after.  Sash clamps would have been the ideal way to hold the planks down flat, but I don't have any and screws were a quick and easy way of doing it.  Drilling plugs using a drill press doesn't take a lot of time and nor, for that matter, does putting them in.

There are two hatches in the sole area, so once I had fitted the planks, I predrilled some of the screw holes, so that everything would line up properly, and then took them down to glue up on a table.

By using washers between the screw head and the wood, I can make sure that there is minimal damage, which makes final finishing a lot faster.

I put all the plugs in with aliphatic PVA, which is a lot quicker and less messy than epoxy for this sort of job.  When the glue had cured, I used my multitool to cut them off.  This worked wonderfully well - made for the job!

Once I'd finished sanding it, I gave a quick skim along the edges to fair them off a little and soften the corner.

Personally, I think it all looks rather smart.  The framing around the doors (fitted to hide my wiggly jigsaw cuts) add a spurious air of quality, heightened by the 'automatic button'.

The tigerwood will quickly become redder - judging by the offcuts kicking around the shed -  and I think makes a pleasant contrast with the kauri.  You can see the finished composter and the catches on the starboard lockers here, too.

And here is the finished composter, showing the bucket. (I had to replace the orange with a black one: the orange one ended up about 5mm too high!)  The white under the seat is the diverter.


The switch panels were sitting around getting dusty, so I thought I might as well fit those, too.

All in all, I'm rather pleased with the whole thing and more than ready to move on with something else!!