Search This Blog

Badger

Badger
In Greenland

Iron Bark

Iron Bark
Under full sail

Fantail

Fantail
At Russell Boating Club's Tall Ships Regatta

Blue Water Medal

Blue Water Medal
Blue Water Medal

Books By Annie Hill

  • Brazil and Beyond
  • Voyaging on a Small Income
Showing posts with label Laying teak decks. Show all posts

15 December, 2019

Back to Bling


I'm working on finishing the decks before moving on to bilgeboards and so on. Laying teak in the cockpit was the final job before I could sign if off as finished.

 At the moment, I climb on and off the boat (dozens of times a day) over the stern and so the after end of the deck lockers in 'in my face' time and again.  I have covered them with teak, but wonder how often I'll see it again, because I shall have a boarding ladder for climbing on and off.  (Negotiating two rudders and the outboard motor would not be easy even if I liked getting aboard by way of the stern.  Which I don't.)

The petrol locker lids also get teak, of course.

With all the teak laid and sanded I have to say that I think it looks rather grand. 

The hinges were a shocking price in NZ, so I had to resort to Ebay.  I am very pleased with the quality of them, but they took the best part of a couple of months to get here!

Although they look like brass for some reason, in the photo, they are in fact stainless steel.  Purportedly 316.

It was about time to tackle the companionway, which was much more straightforward that I anticipated, with memories of the rather marathon effort that was required when I rebuilt Fantail's "washboards".  All that was really required was some additional framing for the acrylic to land on.

The plan is to have a Jester style pramhood and a bubble over it, like we had on Badger.  The bubble means that when the hatch is shut in cold weather, there will still be plenty of light coming in.  It also allows my taller visitors to stand up while working out how to negotiate their way to a seat!

The other thing that required fitting is my echo sounder - I should hate to sail without one, although plenty of other people seem happy to do so.  This took a ridiculous amount of time to fit, because I had to run wires from the electric panel under the cabin sole, all the way back to the lazarette.

 As ever, I was more than a little startled when I flicked the switch to see that it is apparently working.  I'm in 2.3 m of water, so it would have me believe!  I'm not quite sure why it's reading this ...

In winter, standing under a Perspex dome can be as effective as standing in a shower.  I had a second one made out of much lighter material (the outer one is 10mm, the inner one 3mm) and stuck them together with what I hope is an appropriate air gap.  Both domes, made to measure, only cost $300, which I reckon to be one of my better bargains.


Actually fitting it to the deck is going to be quite a problem because of the camber.  Indeed, it has caused me some loss of sleep, but this morning it occurred to me that the obvious thing is to make a flat area on deck and put the rings on that.  (I had been intending to build the rings up and shape them to the deck, but to be honest, that is definitely beyond my skills.

This is the piece of plywood from which the upper ring was cut.  It seemed like an awful waste of wood!  If you can't visualise how the pramhood works, All Will Be Revealed ... in due course.


 The framing is now fitted around the companionway and varnishing is underway.


Well, I might as well say it, because I think more than a few people think that my delight in varnish is a little suspect, but I like varnishing.  In fact the reluctance of the average person to put varnish on to their boat is a constant source of puzzlement to me.  In the days when people owned traditionally-built, carvel boats, they usually had quite a lot of brightwork, which had to be maintained every year, together with the work required to keep the topsides in good order.  And in those days varnish only lasted a season before requiring quite a bit of work to bring it up to scratch.


Now people generally have plastic hulls which require little or no maintenance and very little woodwork on deck, but even the little that they have is apparently too much 'work'.  How is it work, I ask myself, to beautify your pride and joy?  A mystery.  Anyway, it's been downright pleasurable to finish laying the teak and to be able to pick out the bits that I want to have a bright finish.  It would also appear that even people who don't like varnishing themselves often like the look of it, so it's nice to know that it will give other people pleasure, too.

And while I had some mixed up, I finally got to varnish the saloon table, which seems to work well.  Sadly, one piece of the tigerwood has developed a bit of a twist, so the table is far from perfect.  I had hoped that the table would be the stand-out feature in the saloon.  Never mind, it still looks attractive.  It slides fore and aft to allow people to get in at either end and now that it's summer, it slides almost too well.  I shall have to put something on it to hold the top in the right place!


19 November, 2019

It's starting to be worth all the effort!


One thing about laying teak: it may be somewhat tedious and is very messy, but when you stand back and look at it, it's all worth while.  I would have to say, that on odds, fitting out the cockpit (once I'd decided what to do with it!) has been fun, if slow.

 You will remember my agonising over the teak trim around the transom for the outboard, and persuading it into place with a heatgun.  Well, to my astonishment, when I undid the screws and took it off, it retained its shape with hardly any spring back.


It was a cinch to glue in place.  I was so relieved.


 The next job was to paint out the fuel lockers, in which I had put a small platform to take the containers.  There is room for plenty of petrol.  I don't anticipate using a lot; on the other hand, it's not particularly easy to obtain without going alongside a fuel dock for which you generally need a special card.  If I can carry sufficient that I only need to fill up once a year, I shall be very happy and can't see that being an issue.


  There was a certain amount of eye-rolling among my friends as I solemnly set to work cutting out strips of teak and fitting them into the deck lockers.  They were too kind to say it, but I could hear them thinking: "I thought you wanted to get this boat finished"!  However, when (particularly plastic or cloth) containers sit on painted surfaces, the water gets trapped and reduces the life of the paint job.  My aim is to minimise future maintenance and these strips of teak should help keep the lockers less wet.

 
Here is the teak capping in place and sanded flush.

The next thing was to start extending the decking over the lockers so as to form the lids.
 
 While these pieces were being glued up, I cut out the top for the lockers.  I often find it's easier to use my large Japanese saw (for which I recently invested in a new blade) than to set up a guide for the little circular saw, and in this case, one long side had a curve in it, anyway, which the electric saw won't cope with.  It's much easier to follow the line (for me) with a handsaw than with a jig saw, too.

 I was now ready to start laying the first teak.  I puzzled a little while as to whether I should run fore and aft, or parallel with the  cockpit or with the back rests.  In the end I decided it would look better if it was the same as the centre deck and cockpit sole.

In the meantime, I had been fitting the locker top.  Once it was all cut to shape, I then cut out the separate lids for the lockers.  This time I used the hand saw to keep the kerf down to a minimum so that the lids wouldn't be a sloppy fit.  I'd rather sand them down afterwards than try to add extra bits of wood.

 Having said which, I did put teak capping over the sides and ends, which then reminded me that I needed to add teak to the ends of the lockers.  This was done with lots of offcuts left over: it's always satisfying to use these up.

 Here the lids have been pre-coated and I'm preparing to lay the rest of the teak around the cockpit.

 It was quite a fiddle tapering the pieces along the edge, but fortunately I still have heaps of decking left, so the odd mistake isn't too much of a catastrophe.


 Gosh!  That was quick, wasn't it? I wish.  However, when I'm up to my ears in black epoxy, it's not easy to take photos and besides, you have seen the teak-laying process in the past.Although not perfectly symmetrical, the two sides aren't that far out.  The teak varies in width by up to a couple of mm and even I am not so obsessive as to ensure that they match either side.

I fitted the teak to the lids in full length pieces and then took the lid down and cut the lids out, which left me with a kit of teak pieces to fit.


I did all the lids as one, gluing them up in situ with masking tape separating them from each other and from the rest of the locker lid.  Once the glue had cured, I took the hatches off and did the rest of the lid.  This wasn't quite as straightforward as I'd hoped and for the second locker, I glued down the wood on the fixed part first, which made it easier.

The lids than had to be sanded, the gaps filled, sanded, filled, sanded ... you get the idea.

The next stage is to put teak on the fuel lockers.  When that is done, the boat will essentially be finished and I can open the bottle of Bollinger that a kind friend gave me ages ago.  There will be much rejoicing - even if I did hope to have had this finished by the end of October.

Of course, I still need to make the companionway, sort out the pram hood, put on the toe rails and rubbing strakes, fit the stanchions, finish and hang the rudders, work out the tiller arrangement, make the bilgeboards, paint the boat, make the mast, make the sail, sort out blocks and rigging, make the self-steering, fit and wire in the solar panels, finish the davits, make patterns for cushions and sew up their covers and I dare say many other things that I can't think of at the moment.  Please don't remind me of them: I can promise you they won't be forgotten.


12 May, 2019

A pocket super yacht

You may be wondering why I haven't posted for so long.  (There again, you may not!)  Well, the reason is that, in all honesty, laying a teak deck is a long and very unphotogenic business.  There was really nothing to write about.  But now it's all down and you are allowed to ooh and aah, as I have been for the past few days!

 Early on in this process, I decided that the idea of leaving the sanding until the end of the project was a bad idea, for two reasons.  The first was that as time goes on, the epoxy gets harder and harder and the second, as I discovered the hard way, is that it's easy to make a mistake as to where two planks join.  After I fitted one about 6mm out, which doesn't sound much but absolutely shouts at you, I started a routine of gluing, sanding and filling before moving on to the next set of planks. 

 Framing round the deck boxes was tricky - mitres are always a nightmare and, yes, I got one of those wrong, too!  I never said I was a boatbuilder.

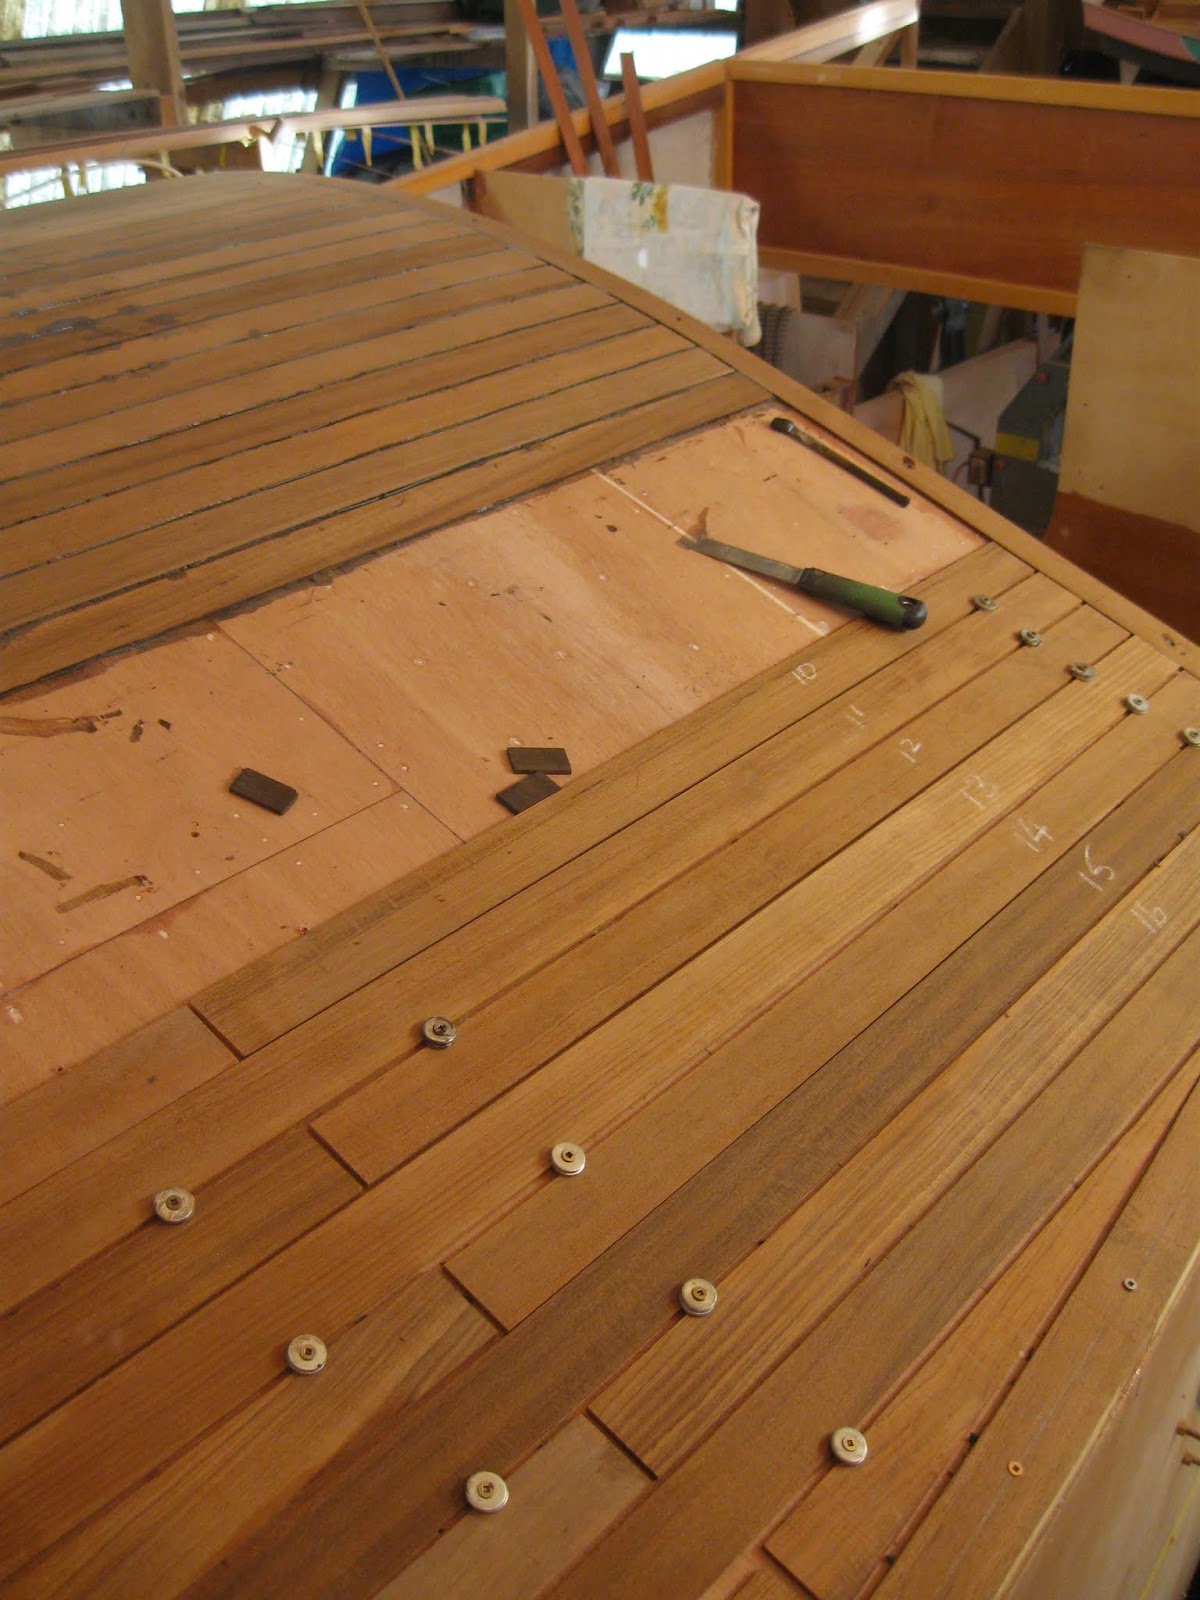
 You may recall that I bought a job lot of decking teak (thank you, Zane, for drawing my attention to it), which is nearly all beautiful, quarter sawn stuff.  It was too thick and came with a little rebate.  I had it sawn down the middle (at vast expense), so ended up with half at about 48mm and half at about 42mm.  I divided it in two and did sums, but knew I had only just enough for the centre deck.  That being so, I fitted all the longer lengths first.

 I used plastic spacers to try to keep the gaps even and washers under the screws held the planks down until the glue went off.  Because I couldn't reject any of the planks, I had to use some distinctly warped pieces, which means that the black lines wobble more than a little in places!

 These two photos are also a bit swanky - I was impressed (and astounded) that the final planks were almost the same on both sides.

 Generally, I used 'penny' washers, because they spread over more of the plank to hold it down.  I have zillions, but still ran out occasionally and had to use smaller ones.  Because the sub deck is only 10 mm thick, I needed to use 2 washers to stop the screws from going right through.

 I was worrying about my supply, so started fitting large areas at a time so that I could make some sort of plan (I'm not sure what!) if I didn't have quite enough.  Thankfully, I did.

 Fit, remove, glue, clean, sand.  Day after day.  (My bursitis, not surprisingly, didn't go away.)


 I was very relieved when I got to the bow and realised that I would have sufficient wood - and even some left over for the deck box lids, which had been a concern.


 Fitting around the big hatch was a little tricky. Because some of the wood was so stubbornly warped, the planks had crept a tiny bit out of parallel, so some fudging was required.

 With the shorter lengths, it was easier to apply the glue on a bench and carry them across to the deck.  Whatever I did, it was a pretty messy job and carbon powder is very dirty stuff to work with.

 These are the final pieces going into place on the starboard side.

 And here they are on the port side.  I am pleased to say that these matched, too.  I hadn't been entirely sure that the cabin front was symmetrical and true, so this was more than a little reassuring.  Not that it matters, but it's nice to know.

 The filled gaps ready for sanding.

 Before and after sanding.  It's a tedious and grubby job, even with the vacuum cleaner attached to the sander, but immensely satisfying to see the nice, clean teak emerging from all the black mess.


  And, finally, the whole deck is covered in teak.
 

I must say, that I think it looks absolutely wonderful.  What is it about teak decks that is so attractive?


It's the sort a deck a superyacht would be proud of - in my humble opinion.  OK, so I'm blowing my own trumpet, but what the hell.  I'm not only very proud of my achievement, I'm truly delighted with the result.  Already I know it was worth all the grief and hard work for the pleasure it will give me on a daily basis.  Gloat, gloat, gloat!!!


07 April, 2019

Teak decks

Well, the first thing I should say is that you shouldn't really try laying a teak deck when you have bursitis of the knee.  The second thing is, resign yourself to it taking a long time, especially if you do happen to have bursitis!  However, I've been asking a lot of my ageing body, so can't really complain if it protests occasionally.  It is slowly improving and would no doubt improve a great deal more if I didn't spend all day climbing up and down ladders, steps and stairs and trying not to kneel on it.

While the covering boards were getting used to the idea of bending, I tackled the front of the cabin.

  I decided to laminate up this time and found some very thin pieces of teak that would be unsuitable for the deck, but were ideal for this job.  They flopped very nicely into place.

 I laid down clear plastic tape and used the deck itself as a former.

 While the glue was going off, I persuaded the covering boards abaft the bilgeboard cases into place and screwed them down.  I won't glue them until the end, because I think it will be easier to fit the final pieces of teak without them permanently in place.

 In spite of being relatively narrow and thin, and in spite of having been bent at a greater degree for several days, they were somewhat reluctant to do as they were bid.  I hope that by the time I come to glue them down they will have finally got the idea.

 With the forward trim glued up, I planed it flat on each side and tidied it up top and bottom.

 It screwed and glued into place very nicely and with a coat of epoxy to protect it for the duration, finished off the cabin front attractively.

 The after one was sanded smooth and the covering board screwed into place and then glued down.


 Then I started laying the decks.  I forgot to take any photos for the first few planks, probably because I was so excited to be using this teak at last.

It's hard to believe, at this stage, that I will end up with a beautiful teak deck.  The black glue makes a terrible mess.

However, for the sake of morale I have cleaned up an area of it as can be seen in this enlargement from the above photo.  It will look pretty splendid when it's all done, I think!