
Search This Blog

Badger

Badger
In Greenland

Iron Bark

Iron Bark
Under full sail

Fantail

Fantail
At Russell Boating Club's Tall Ships Regatta

Blue Water Medal

Blue Water Medal
Blue Water Medal

Books By Annie Hill

  • Brazil and Beyond
  • Voyaging on a Small Income
Showing posts with label Norsand Boatyard. Show all posts

29 November, 2020

Out she comes!

 Well, we've finally made it out of the shed.  Those of you who are impatient can scroll down to look.  Otherwise, bear with me while I finish off the mast.

I have had more than my share of fatiguing, stainless steel fittings at the masthead.  Even 316 "isn't what it used to be" and I have tried to avoid it where possible in this boat.  The worst seems to be metal to metal, so I thought to avoid this by using webbing loops instead of eyebolts.  Racing yachts use Dyneema for various fittings that used to be made out of metal and the webbing will probably last longer.  It has a 500 kg breaking strain, which should be enough for the loads of my rig.  The mast should be (relatively) easy to lower so that I can inspect the top, too.

I made loops out of webbing and sewed them to a backing strip and to each other.  The double loop is for the two blocks for the halliard.  I then sandwiched them between two discs of plywood, which were then glued together.  Once the epoxy had cured, I filled in any gaps that were left and painted the whole thing.  Epoxy sticks really well to something like this webbing!

I painted the topmast my 'signature' aqua, like I used for Fantail.  In the end, I couldn't resist the temptation and varnished the yard!

The yard and the battens were put safely out of harm's way in Marcus's lean-to at the back of the shed.


I also painted the topmast fitting and attached it with Simson's Marine Glue, leaving the screws in place for extra security for the whole lot.  The complicated graffiti is in order to line up the (NASA) tricolour light.  (No white light: I think anchor lights should be down at eye level, where people can see them when coming into an anchorage, not way up in the air.)  I shall run a string line down from the arrow on the top of the tricolour to the base of the mast and mark the forward face of it before putting it in.


The usual approach to putting wiring down a mast is to use a conduit, but these are made of hard plastic and in order to stop them rattling around in annoying fashion, require attaching to the mast.  I don't want to put holes in my mast and conduit isn't cheap.  Instead, I have used 'pool noodles', which should make a gentle swishing noise, rather than a 'clang, clang' and with luck, will not even be audible from inside the boat.  I brought the two parts of the mast close together, hauled the wire down with a mouse and then shoved up the pool noodles from the bottom of the mast. 

Gordon, who has been having to travel back and forth to Auckland, was roped in again, for joining the two parts together. 

We carefully levelled and aligned the two parts and used plastic tubing as rollers.  Gordon held the topmast, I pushed on the lower one, and they went together very nicely, with a satisfying excess of glue squirting out.  I chose a flexible glue over epoxy, because the wood and the alloy may well move very differently as temperatures fluctuate.  The sun can be pretty fierce in Aotearoa and on a calm day, the mast might get quite hot.

With everything in place, we could push the excess pool noodle into place. They seemed to go quite far up the wooden section, in spite of all the dribbles of epoxy inside that part.

Getting the final alignment perfect took a bit of fiddling about, and we had to work quite hard to ensure it was level along its length.  I went back later in the day and checked again and put extra glue around into any hairline cracks, which I cleaned up later. 

With the boat just about complete, I asked the yard to arrange to pull her out of the shed.  Several friends came by to join in the fun and it was a wonderful day.

The lower part of the front of the shed has been removed and the doors swung open so that I can finally get a proper view of my boat.  Being a Chinese junk she, of course, has eyes on the bow.

The 'tuning fork' trailer was manoeuvred into the shed.

And carefully moved under the cradle.


Then the tractor slowly pulled Fanshi out into the sunshine.


It was incredibly exciting to see her for the first time.  She looked remarkably like the image I have had on my phone for several years!

Marcus knows an amazingly talented woodworker, Ricardo, and he got him to carve two dragons and a sun for me, which he gave me for a birthday present.  (What a gift!)  I also paid Ricardo to make the eyes.  They all look fantastic!!

It was great to be able to stand back and actually walk around the whole boat from a distance.

I am dying to know what David will think about his creation, now that he can see her properly.
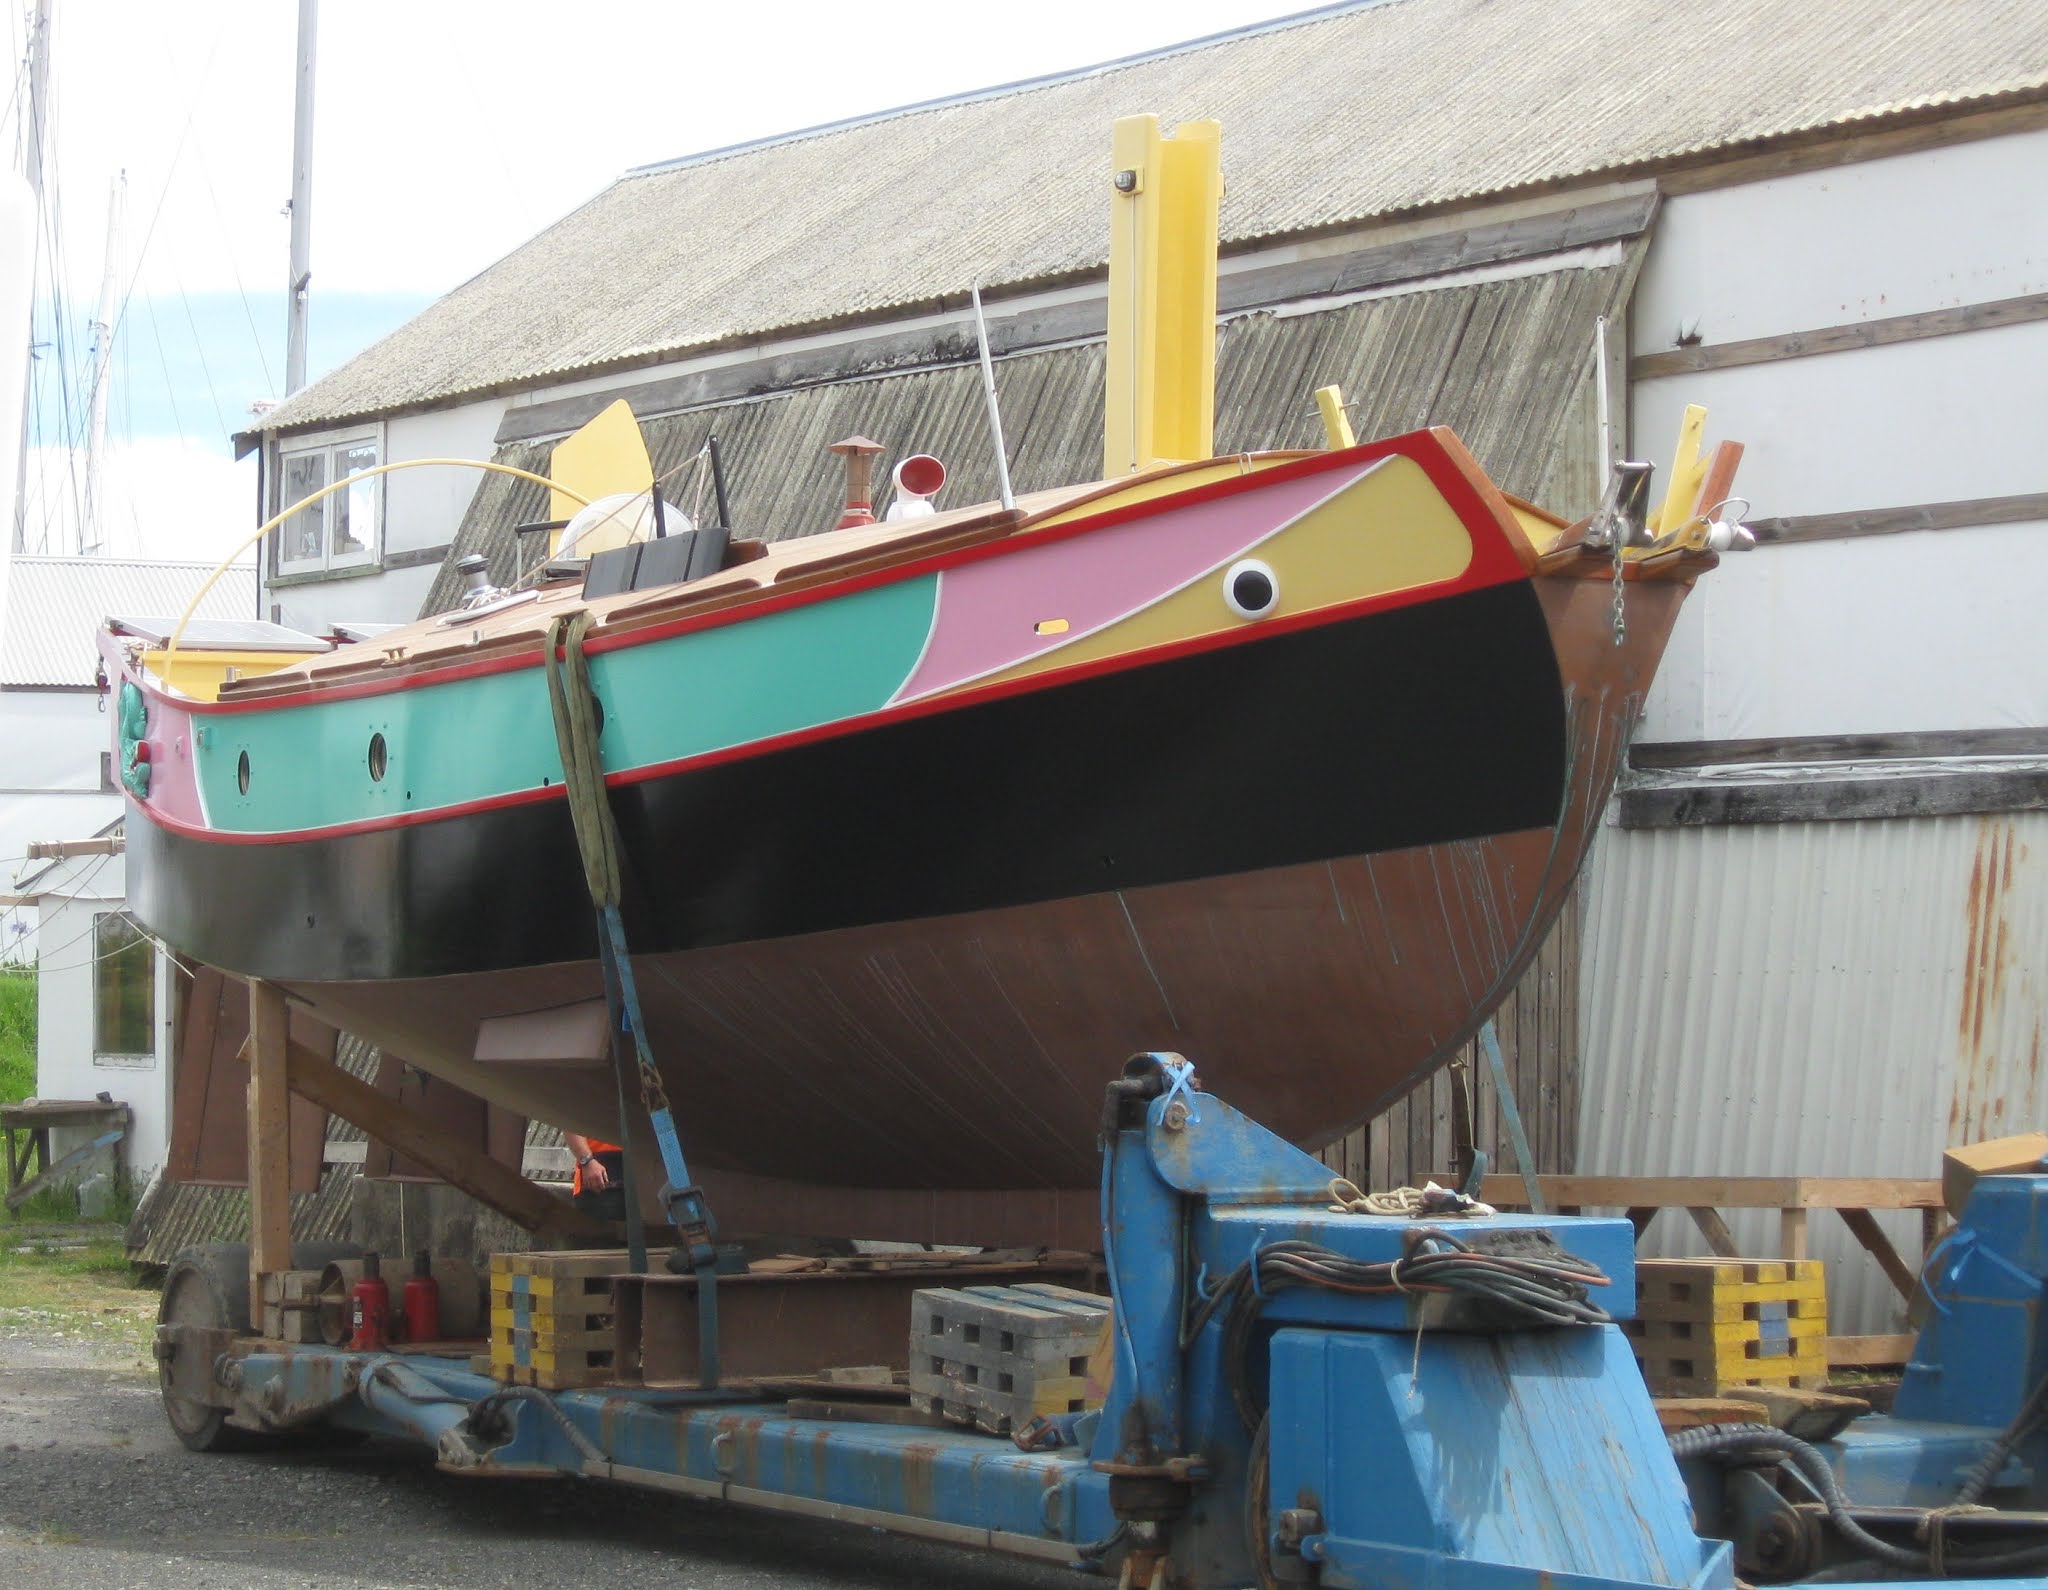

With the yard full to overflowing with Covid-stranded boats, Fanshi was shoehorned into the space next to the shed where she was built. Now I will have to wait until she's launched to stand back and her in her entirety again.

And I will need to get the name on the stern, too.


A close up of one of the dragons.

And an eye.

And a view of the wonderful bow, which I really love.

And the other dragon.

Finally, a view from Tony's boat, showing the deck, wet with rain.  Make the best of it, soon it will weather to grey and never look quite so glorious again!

Now, I need to cover the cushions, make the sail, put the mast in the tabernacle and rig the boat.  Then we can take to the water.  If I pushed it, I could be ready for Christmas, but have decided to slow down and enjoy this final part of the project.  More to the point, I don't want to be sailing my unknown boat and finding out how she behaves at anchor over the holiday period, when there are boats everywhere and all the anchorages are full.  There's no hurry.  I can sit out in the sunshine once more.


12 July, 2020

Tornado, bilgeboards, preparing for painting

Yes, you did read that correctly.  Just over 2 weeks ago, a tornado swept through the boatyard leaving a trail of chaos and destruction.  It was pitch dark at the time and I had just knocked off for the day.  We'd been having a few thunderstorms and as I waited for the water to heat up so that I could wash, the shed was hit with a tremendous gust of wind, apparently pushing the wall in towards me, immediately followed by rending and crashing noises.  I assumed that part of the shed had been destroyed and went downstairs to look.  I opened the door and the torchlight showed me a heap of plastic canvas and broken timber.  Not my shed, but the one next door.  I picked my way through the debris and made a careful circuit of the shed.  The only damage appeared to be torn plastic canvas.  Looking around a bit further I could see boats had fallen over.  My first thought was to check Shirley: Speedwell was just fine and Shirley had barely noticed anything other than a big gust.  Going back to my shed, I met the yard manager looking at the wreckage of Tony's shed.  It was he who told me that it must have been a tornado.  Fortunately,  it was followed by total calm, which lasted for about another 15 hours.  I then  phoned Tony, who came straight away with his partner.  From what we could see, his boat appeared OK, but it was hard to tell.   Tony has worked very hard on restoring the boat he inherited from his parents: that it could be seriously damaged didn't bear thinking about.  (In fact, by some miracle, the boat was barely scratched.)  My guardian angel had obviously been there for me and I went back upstairs, poured myself a stiff drink - and started to shake as the reality of what might have happened, started to sink in.


The photo above was taken the following morning, but you can guess how I felt when I first opened the door.  About 8 boats had been sucked up and dropped  down again, capsizing their cradles in the process. 


A Prout catamaran had ended up on its side


Two boats were more fortunate and had only been shifted in their cradle.


A dinghy that had been sitting on the foredeck of a boat on the other side of the shed, had been swept up and left entangled in the rigging of a ketch some distance away.  Now, in daylight, I could see the mess that had been Tony's shed.


It was amazing that the boat had come through more or less unscathed.


As I mentioned, I could only be grateful that the tornado had effectively missed me.  So I went back to building my boat.

I had noticed, on some photos of real Chinese junks, that the different colours were separated by a small strip of wood, often painted white.  This struck me as both attractive and practical,  making painting easier without using vast amounts of masking tape, so I decided to do the same.  The strips look more pleasing when slightly curved, so I laminated up strips of Douglas fir.  (Shirley,  when she saw what I was doing, shook her head and commented that it was no surprise that I am still building this boat!)


I sanded them all up and fitted them, using a few panel pins and epoxy.


I was very pleased that they looked as I'd hoped they would.


I have now reached one of those stages where everything I want to do depends on something else being fitted, or at least decided upon.  I  am putting a bench across the lute, to stiffen and support it for the sheets, but to do this, I really need to know just where the tillers will be and that is complicated by the fact that the trim tab tillers need thinking about as well as the placement of the self steering gear and, while we are it, the access to the davits and the position of the solar panels, which might affect that. And,  of course, the BBB has to be able to tilt forward to 180°, without interfering with the steering mechanism,  itself complicated by the fact of having two rudders.  David nobly offered to make the self steering for me, saving me vast amounts of time and anguish and mercifully it arrived a few days ago. 

However, while I was exercising my brain about all this business at the stern, Marcus came to do some post-tornado repair to the shed.  Gordon, who owns Tystie,  has been here building himself a new dinghy and suggested I take advantage of having two sets of hands to load the bilgeboards into their slots.  What a brilliant idea!


We tied some ropes to the block and the fitting already on the boards.


With Marcus heaving from below and Gordon tugging from above, the boards were raised to deck level.


With two strong and capable friends, I even got the chance to grab a couple of photos.


We used cloths to protect the deck and there was just about enough to hold onto on the boards that they could be moved with some precision.  The black plastic that  Marcus is holding also acts as the stop for the board.


It caught up slightly on the wedge at the bottom of the case, which supports the downhaul block.


Once that was dealt with, the boards slid w-a-y down in the case!  The stop, it would appear, is in case the rope slips or breaks, rather than where the board would normally be.


We heaved them  back up to a more acceptable "draught" and propped them up on saw horses, until I can sort out rigging them.  This has every promise of being quite a mission, so I'm putting it off for the moment while I carry on getting the stern sorted out and the topsides ready for painting.


Last weekend,  some other friends were in the shed and we started discussing the dinghy and the davits.  Moments later and my little dinghy was taken down from the wall and busy hands were fetching rope, making knots and threading blocks.  It was decided that although the dinghy is shorter than the distance betwwen the davits, she would not need a beam for the falls, but that they would work just fine from the davits themselves.  This was a relief, because I had been wondering just how hefty the beam would have to be to hold a dinghy that might possibly be pooped by a big wave.  A beam is still required for mounting the solar panels, but it can be much less substantial.   So I laminated something from 2 long lengths of kauri left over from another job, with teak on top.


I notched out the davit to receive it.


I fitted the beam and affixed chocks to it and to the lute.  This photo shows the panels in place.  They are held securely by the chocks forward and will be lashed to the chocks aft.  I don't really want to screw through the alloy frames.  Not only will it damage the anodising, but a few years hence and the screws will probably be impossible to remove because of galvanic action between the dissimilar metals.


My wonderful self-steering gear is in the foreground.  Over the engine is "thinking in action", while I try to work out how and where to link the two rudders, how to make a tiller, how to have it raising and how to set everything up so that I can get access to the hull by the engine, where I may need to stand on occasion.  Indeed,  I suspect that I will have to go there to attach the davit falls to the dinghy.  And, of course, I also need to decide where the bench goes, and the self-steering, and how it will be linked to the trim tabs!  And this is meant to be a simple boat!


I'm quite pleased with how the solar panels fit.  They are not too intrusive.

Last time I blogged, some people said that the layout wasn't working on their computer screen.  Blogger have a new system.  It's hard work sorting it on this tablet as it is (my computer died a few months ago).  I've tried a different way of doing things and hope it works. If not, then you will have to read it on a phone or tablet, I'm afraid.


04 August, 2019

I thought the cockpit was going to be a mission...

... and I was right.    It is more complicated than it would normally be due to the fact that there are two rudders and thus, at least in theory, two tillers, in addition to a (physically) large outboard motor.  If I were designing a cockpit from scratch, the things I would consider are putting the seat high enough for me to see over the cabin and having the cockpit sufficiently narrow that I can brace my feet against the other side when the boat is heeling.  I am, you may recall, a tad under 5ft 2ins tall (155cm) and also have very small feet which means that the cockpit has to be relatively narrow for me to be comfortable in it.  Easy enough with just one tiller in the middle, but a whole different story when the tillers are well out from the centre.  To my mind it is an obvious impossibility to steer from a comfortable distance outboard of one of these tillers and brace myself against the side of the cockpit.  I can't imagine that steering from in front of one is going to be very comfortable, so the easiest solution would appear to be to join them with a bar, as with many catamarans, and steer from that.  But let us not forget our outboard motor: the Big Black Beast sits up high and sits up even higher and intrudes into the cockpit when it's tilted at right angles, out of the water.  To be perfectly honest, for a while I was tempted to get rid of it.  But then I remembered what it's like to have one's destination within sight - but not within reach due to lack of wind.

In addition to the cockpit, I have also had to consider the storage under it. I have a rooted objection to deep cockpit lockers that can get filled with water and which go deep down into the boat, so that many of the objects stored there are almost impossible to retrieve.  I wanted a nice, dry lazarette, which I can access with ease at present, and hopefully without too much difficulty for another 10 years or so before old age puts an end to such gymnastics.

I had a boat; I had a model; I had drawings.  They all told a slightly different story.  The latter two were finally dismissed as more of a distraction than an aid and I started again from scratch.  Please keep your fingers crossed that I've done it right!

 Since I couldn't make any decisions without the Big Black Beast in place, this had to be manhandled onto the stern.  The BBB is nearly as tall as I am and about half my weight.  Thankfully, my friends Rob and Maren have their boat at Norsand and are both bigger and stronger than I, so that solved that little problem.  Of course one of the bolts to hold it in place was seized. 

The BBB looked enormous.  In this photo the drive leg is resting on the bottom of the boat right at the stern.


 Tipped horizontally, it seemed even larger! Obviously, the first thing to do was to cut a slot so that it could hang vertically - and the question on every lip was would the propeller be in the right place.  It needs a slot 6" (153 mm) wide. Thankfully, I had a 6" hole saw.

 With my trusty Japanese saw, I cut out the rest of the bottom of the boat, which wasn't the easiest job I've ever done.  And thankfully, the anti-cavitation plate was 60mm below the bottom of the boat.  50mm is the recommendation, with an addendum that where thrust is more important than speed, an extra 10mm should be added.  We got that bit right!

 I had already done preliminary framing for the cockpit before fitting the motor, but the BBB's presence made me realise that Plan A wasn't going to work.  After a couple of days of looking at drawings, model and boat I realised that nor were Plans B, C and D.  This was when I abandoned all preconceptions and started to deal entirely with harsh reality.  The first obvious point was that the seats needed to be raised, which meant that the cockpit sole had to be raised and the bridgedeck and, therefore, the sill into the saloon.  I'm small, as we all know, but would like to welcome guests down below.  Most people I know managed to get down below on Fantail with only a few complaints.  I put in a new sill a few mm lower than the one on Fantail.  Sorry, friends, it's the best I can do.

 My idea is to have the cockpit seating extending right out to the side of the boat.  There will be back rests and lockers built behind these for gear that can get wet.  The lids of these lockers will provide additional seating which will be great if I have friends on board, or in hot weather when I want to be able to feel the breeze.  Things were still somewhat tentative at this stage: I wanted the BBB to stay in place to get a proper feel for how the spaces worked.

This meant my manhandling a sheet of plywood 1040 x 1430 rather more times than I care to think, up the ladder, over the side of the boat and down onto its framework while I marked, planed and fitted it several times.  After a bit of tweaking of various pieces of framing timber, I decided it should probably do the job.

 
 Finally, the BBB could be removed and fitting the mirror image piece was straightforward.

 At this stage, it behoved me to think about the lazarette under the cockpit.  It is certainly going to be easier to fit it out before the cockpit itself is in place.  I need 20 litre containers for my cooking fuel and I need storage for items like paint, tools, bosun's stores, spare fastenings, glue, etc, etc.  I'm now regretting having given some of my empty 20l epoxy containers away.  Just between you and me, my enthusiasm for building lockers is waning and the space under and around the cockpit is HUGE.  The wood entailed in making lots of lockers will weigh a good few kilos, but worse, a person will feel a duty to fill said lockers and they will hold a lot.  It occurred to me that a better plan might be to use plastic boxes on shelves as being a highly inefficient use of space and therefore saving a fair bit of weight in a critical part of the boat.  I have some mega boxes (courtesy of Rob and Maren) that I am storing my Stuff in, so I tried these for size.  I could make storage for them, but they were going to be a nightmare to person-handle about:  something about a third of the size would make more sense, so I bought a sample from the Red Shed.

 Back to mocking up (can I get head and shoulders in this space; can I reach that far back?) and I concluded that what is required is a shelf for 40l of meths down low and a shelf above this and outboard for 4, 26l plastic boxes.

I had had an excessively complicated plan of boxing in the meths entirely, due to a desire to have a pump for one container to save having to lift it and decant from it.  My friend Gordon looked at my empty WEST drums, looked at the full one and asked why I didn't use on the their mini-pumps for the meths.  Duh.  Sometimes I can't see the wood for the trees.

Here is the space under the starboard seat/deck slowly taking shape.  The jerricans will be lashed down - no lid required.  The shelf will have a fiddle and there will probably be a long bar of wood to keep the boxes in place in excessively inclement conditions.  A knee is going in the middle of the shelf.  Between the jerricans and the shelf is space for things like plywood.  I may run an upright 100 mm strip of plywood so that a certain amount of Stuff can live there in peace.  You always need odd bits of wood, plywood, etc. 

Here we are at Plan K viii (f):  I can put spare oars right across the stern and have a couple of tool boxes that will fit perfectly on the bottom of the boat, under the cockpit sole.  The plywood on the right hand side of the photo will be cut down so that the seat runs all the way to the stern.  There's a fair amount of joinery has to go on around here, too: this space will be used for petrol tankage.


Now, I have to glue down framing, fillet various corners, glue in knees, sand and paint.  Then I can start actually to assemble the cockpit.  It's all more or less taking place and I think I have more or less "nutted it out" as my friend Marcus would put it.  But it nearly resulted in a nervous breakdown, my abilities to be able to see things in three dimensions being severely limited.  There are still more than a few unknowns, but I am hoping nothing trips me up too badly.  It's good to have a plan to be going on with for a while, anyway, if only to let my brain stop hurting!