Search This Blog

Badger

Badger
In Greenland

Iron Bark

Iron Bark
Under full sail

Fantail

Fantail
At Russell Boating Club's Tall Ships Regatta

Blue Water Medal

Blue Water Medal
Blue Water Medal

Books By Annie Hill

  • Brazil and Beyond
  • Voyaging on a Small Income

25 August, 2019

It all takes time


Having more or less worked out what I'm doing in the cockpit and cut out all the material, I've largely spent my time coating plywood.  Four coats of paint on each side (for some pieces) and with the cold weather preventing me from doing more than one coat per day: it all takes time.

 I did have the pleasant distraction of a winter junket, attended by fellow junkies and the good ships, Havoc (yet to be converted),  

Photo: Alan Martienssen
Serendipity,

Photo: Marcus Raimon
 Tystie

 and Zebedee.  

Photo: Alan Martienssen
Freebie was there, too, which gave me a chance to get out sailing (it was a bit too gusty to be fun in the bigger boats.)

Alan from  Zebedee and Gordon from Tystie, also tried out both Freebie and Serendipity.


 Havoc performed the role of party central,

Photo: Graeme Kenyon

and as bad weather made us decide to postpone the junket for a week, my shed took on its other role of JRA(NZ) Central.  Alan and Gordon took advantage of the space, temporarily to park stuff, or carry out one or two little projects.  I really enjoyed having their company and felt a little bereft when everyone went away again.  Still, it's all an extra incentive to me to get my boat finished and get back on the water myself.

 Meanwhile, I carried on with the cockpit - or more accurately, the space under the cockpit, which I call the lazarette.  I carefully made the boxes for the meths, only to find that one of them was - literally - a couple of mm too narrow.  I had to take the back off and fit it again with a filler piece.  Sigh.
 The simple task was to prepare the area for painting.  A lot of it was already sanded, so it shouldn't take long.  Hah! I spent at least four days, sanding, filling, touching up epoxy and sanding again.  I couldn't believe how long this little bit of "prep" took!

 Of course, preparation isn't only the key to an attractive finish, it's the key to the coatings sticking and protecting the wood.  It is probably the most tedious aspect of building a boat; unfortunately it is also one of the most necessary.  So, after carefully spreading epoxy all over my plywood, I equally carefully sand some of it off again.

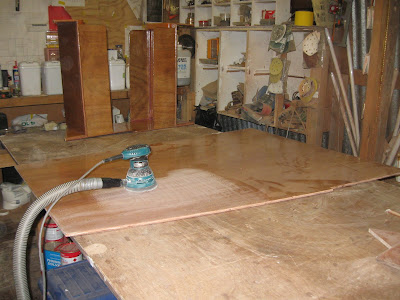
 There will be two big shelves under the side decks, each holding four, 26l plastic boxes in which will be stored whatever it is I decide needs storing there.  I offered these shelves and the sidedecks (one of which is being sanded in the photo above) to their places in the cockpit, more times than I care to think about.  I was incredibly grateful if Gordon or Alan happened to be about when I was doing this: it made the job a lot easier.

 Finally, I masked everything up ready for painting.  The shelves will be filleted into place, as will the meths boxes, so I want to avoid painting in those spots.  The Carboline two-pack polyurethane is incredibly hard to scrape back, once it has cured.

 I may not like sanding, but I do enjoy painting, so I spent several happy hours with a half-sized mini roller and paint.  I find these cut-down rollers excellent for the fiddly sort of work I've been doing - they can get into really small spaces and it's rarely that I need a brush.  It also means that I can clean them out between coats, and keep them in a small pot of thinners.  They will last for months and months used like this.  The bits of closed cell foam on the bottom of the boat are a less-than-successful effort to stop me sliding slowly and inexorably towards the bulkhead.  I end up kicking my socks off to get a bit of traction on the slippery, sloping surface, but am worried about getting chilblains as a result.

 While the paint was mixed up, I coated the shelves for the boxes,

 the boxes for the meths,


 the side decks and the knees for the shelves.

 Yes, I know, the third coat really doesn't look that much different from the previous ones.

 With the top of the shelves (and one side of the knees) painted, I turned the shelves over to fillet on the knees.  Taping them to a couple of set squares solved the problem of them wobbling about, while I applied the filleting mix and then waited for it to cure.  Which takes a long time in the middle of winter.

 While waiting for paint - and glue - to dry, I set about making a nice little grating for the companionway.  The idea is that the drips from wet oilies go into this partitioned-off area of bilge rather than all over the saloon sole.  I sawed up tigerwood with gay abandon for this project.

Finally, I finished painting the hull.  The white paint is very bright and shiny.  I want to be able to find things in this space, which will have no natural lighting. (The bit of towelling is to catch drips from the roof of the shed which land dead centre on the bottom of the boat!)

I am just about ready to assemble the various pieces, now.  That should look like some progress!

04 August, 2019

I thought the cockpit was going to be a mission...

... and I was right.    It is more complicated than it would normally be due to the fact that there are two rudders and thus, at least in theory, two tillers, in addition to a (physically) large outboard motor.  If I were designing a cockpit from scratch, the things I would consider are putting the seat high enough for me to see over the cabin and having the cockpit sufficiently narrow that I can brace my feet against the other side when the boat is heeling.  I am, you may recall, a tad under 5ft 2ins tall (155cm) and also have very small feet which means that the cockpit has to be relatively narrow for me to be comfortable in it.  Easy enough with just one tiller in the middle, but a whole different story when the tillers are well out from the centre.  To my mind it is an obvious impossibility to steer from a comfortable distance outboard of one of these tillers and brace myself against the side of the cockpit.  I can't imagine that steering from in front of one is going to be very comfortable, so the easiest solution would appear to be to join them with a bar, as with many catamarans, and steer from that.  But let us not forget our outboard motor: the Big Black Beast sits up high and sits up even higher and intrudes into the cockpit when it's tilted at right angles, out of the water.  To be perfectly honest, for a while I was tempted to get rid of it.  But then I remembered what it's like to have one's destination within sight - but not within reach due to lack of wind.

In addition to the cockpit, I have also had to consider the storage under it. I have a rooted objection to deep cockpit lockers that can get filled with water and which go deep down into the boat, so that many of the objects stored there are almost impossible to retrieve.  I wanted a nice, dry lazarette, which I can access with ease at present, and hopefully without too much difficulty for another 10 years or so before old age puts an end to such gymnastics.

I had a boat; I had a model; I had drawings.  They all told a slightly different story.  The latter two were finally dismissed as more of a distraction than an aid and I started again from scratch.  Please keep your fingers crossed that I've done it right!

 Since I couldn't make any decisions without the Big Black Beast in place, this had to be manhandled onto the stern.  The BBB is nearly as tall as I am and about half my weight.  Thankfully, my friends Rob and Maren have their boat at Norsand and are both bigger and stronger than I, so that solved that little problem.  Of course one of the bolts to hold it in place was seized. 

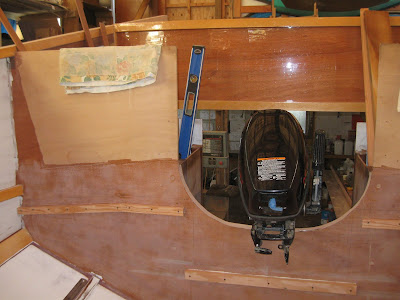
The BBB looked enormous.  In this photo the drive leg is resting on the bottom of the boat right at the stern.


 Tipped horizontally, it seemed even larger! Obviously, the first thing to do was to cut a slot so that it could hang vertically - and the question on every lip was would the propeller be in the right place.  It needs a slot 6" (153 mm) wide. Thankfully, I had a 6" hole saw.

 With my trusty Japanese saw, I cut out the rest of the bottom of the boat, which wasn't the easiest job I've ever done.  And thankfully, the anti-cavitation plate was 60mm below the bottom of the boat.  50mm is the recommendation, with an addendum that where thrust is more important than speed, an extra 10mm should be added.  We got that bit right!

 I had already done preliminary framing for the cockpit before fitting the motor, but the BBB's presence made me realise that Plan A wasn't going to work.  After a couple of days of looking at drawings, model and boat I realised that nor were Plans B, C and D.  This was when I abandoned all preconceptions and started to deal entirely with harsh reality.  The first obvious point was that the seats needed to be raised, which meant that the cockpit sole had to be raised and the bridgedeck and, therefore, the sill into the saloon.  I'm small, as we all know, but would like to welcome guests down below.  Most people I know managed to get down below on Fantail with only a few complaints.  I put in a new sill a few mm lower than the one on Fantail.  Sorry, friends, it's the best I can do.

 My idea is to have the cockpit seating extending right out to the side of the boat.  There will be back rests and lockers built behind these for gear that can get wet.  The lids of these lockers will provide additional seating which will be great if I have friends on board, or in hot weather when I want to be able to feel the breeze.  Things were still somewhat tentative at this stage: I wanted the BBB to stay in place to get a proper feel for how the spaces worked.

This meant my manhandling a sheet of plywood 1040 x 1430 rather more times than I care to think, up the ladder, over the side of the boat and down onto its framework while I marked, planed and fitted it several times.  After a bit of tweaking of various pieces of framing timber, I decided it should probably do the job.

 
 Finally, the BBB could be removed and fitting the mirror image piece was straightforward.

 At this stage, it behoved me to think about the lazarette under the cockpit.  It is certainly going to be easier to fit it out before the cockpit itself is in place.  I need 20 litre containers for my cooking fuel and I need storage for items like paint, tools, bosun's stores, spare fastenings, glue, etc, etc.  I'm now regretting having given some of my empty 20l epoxy containers away.  Just between you and me, my enthusiasm for building lockers is waning and the space under and around the cockpit is HUGE.  The wood entailed in making lots of lockers will weigh a good few kilos, but worse, a person will feel a duty to fill said lockers and they will hold a lot.  It occurred to me that a better plan might be to use plastic boxes on shelves as being a highly inefficient use of space and therefore saving a fair bit of weight in a critical part of the boat.  I have some mega boxes (courtesy of Rob and Maren) that I am storing my Stuff in, so I tried these for size.  I could make storage for them, but they were going to be a nightmare to person-handle about:  something about a third of the size would make more sense, so I bought a sample from the Red Shed.

 Back to mocking up (can I get head and shoulders in this space; can I reach that far back?) and I concluded that what is required is a shelf for 40l of meths down low and a shelf above this and outboard for 4, 26l plastic boxes.

I had had an excessively complicated plan of boxing in the meths entirely, due to a desire to have a pump for one container to save having to lift it and decant from it.  My friend Gordon looked at my empty WEST drums, looked at the full one and asked why I didn't use on the their mini-pumps for the meths.  Duh.  Sometimes I can't see the wood for the trees.

Here is the space under the starboard seat/deck slowly taking shape.  The jerricans will be lashed down - no lid required.  The shelf will have a fiddle and there will probably be a long bar of wood to keep the boxes in place in excessively inclement conditions.  A knee is going in the middle of the shelf.  Between the jerricans and the shelf is space for things like plywood.  I may run an upright 100 mm strip of plywood so that a certain amount of Stuff can live there in peace.  You always need odd bits of wood, plywood, etc. 

Here we are at Plan K viii (f):  I can put spare oars right across the stern and have a couple of tool boxes that will fit perfectly on the bottom of the boat, under the cockpit sole.  The plywood on the right hand side of the photo will be cut down so that the seat runs all the way to the stern.  There's a fair amount of joinery has to go on around here, too: this space will be used for petrol tankage.


Now, I have to glue down framing, fillet various corners, glue in knees, sand and paint.  Then I can start actually to assemble the cockpit.  It's all more or less taking place and I think I have more or less "nutted it out" as my friend Marcus would put it.  But it nearly resulted in a nervous breakdown, my abilities to be able to see things in three dimensions being severely limited.  There are still more than a few unknowns, but I am hoping nothing trips me up too badly.  It's good to have a plan to be going on with for a while, anyway, if only to let my brain stop hurting!