Search This Blog

Badger

Badger
In Greenland

Iron Bark

Iron Bark
Under full sail

Fantail

Fantail
At Russell Boating Club's Tall Ships Regatta

Blue Water Medal

Blue Water Medal
Blue Water Medal

Books By Annie Hill

  • Brazil and Beyond
  • Voyaging on a Small Income

24 March, 2019

Hatches!!


I've been a bit busy and distracted by life outside boatbuilding, recently, which is why I haven't had chance to blog.  Frustratingly I've also been slowed down by having done something to my (other) knee, which makes if painful to walk and excruciating to kneel on.  Ibuprofen is helping.  I've even rested it, but the psychological trauma ensuing from that is probably worse than the physical trauma from using it!!

 With the second layer of plywood on, it was time to fill and sand.

 In the photos, it looks remarkably even.  In reality less so, but I don't mind.  I've done my best and it will do what it is intended to: hold the hull together and keep out the water.

 This is meant to be a photo showing how the centreline of the deck is perfectly over the centreline of the bottom of the boat.  Of course, you can't see it and of course by moving the camera one way or the other I could have fudged it.  But anyway, it's a way of having a quiet boast.  I'm rather proud of myself (not to say more than a little startled!).

 The next step is to put the teak on.  Well, no, actually, I need to put on the hatch frames first and fix the king plank - and the covering boards.  But it's all made of teak so I guess I have started laying the deck.  One of the reasons for marking the centreline was to try to ensure that the hatch framing was parallel to it.  The laid decks would make it horribly obvious if it weren't!

 Having done a lot of measuring both on deck and below I started to cut out the opening for the hatch.  Very scary!  For those who object that it's not on the centreline:
(a) the centreline has been reinforced to take the loads from the mast (b) I like the hatch to be over my bunk (c) it won't leak any more or less off to one side.  Either it leaks, or it doesn't.

 With my natty little battery circular saw, I joined the dots (the holes made using a hole saw.  Wonderful things).

 It ended up just about where I had planned.

 I dry fitted it, but subsequently came to the conclusion that you don't want too snug a fit.  It was hard to get the edges epoxy sealed because the thickness of the epoxy meant that the hatch jammed.

I could have put framing for the hatch in when I was doing the plywood, but I wasn't sure exactly where it would end up.  It was no more difficult to do it now.


 I traded (in advance) my thicknesser for a large piece of teak that my friend, Marcus, had.  With huge trepidation - have you any idea what teak costs?? - I cut it and planed it.  Then I cut mitres and glued it all together to make a framework for the hatch.

 With the glue cleaned up, the wood sanded and a coat of epoxy on, it looked pretty smart.

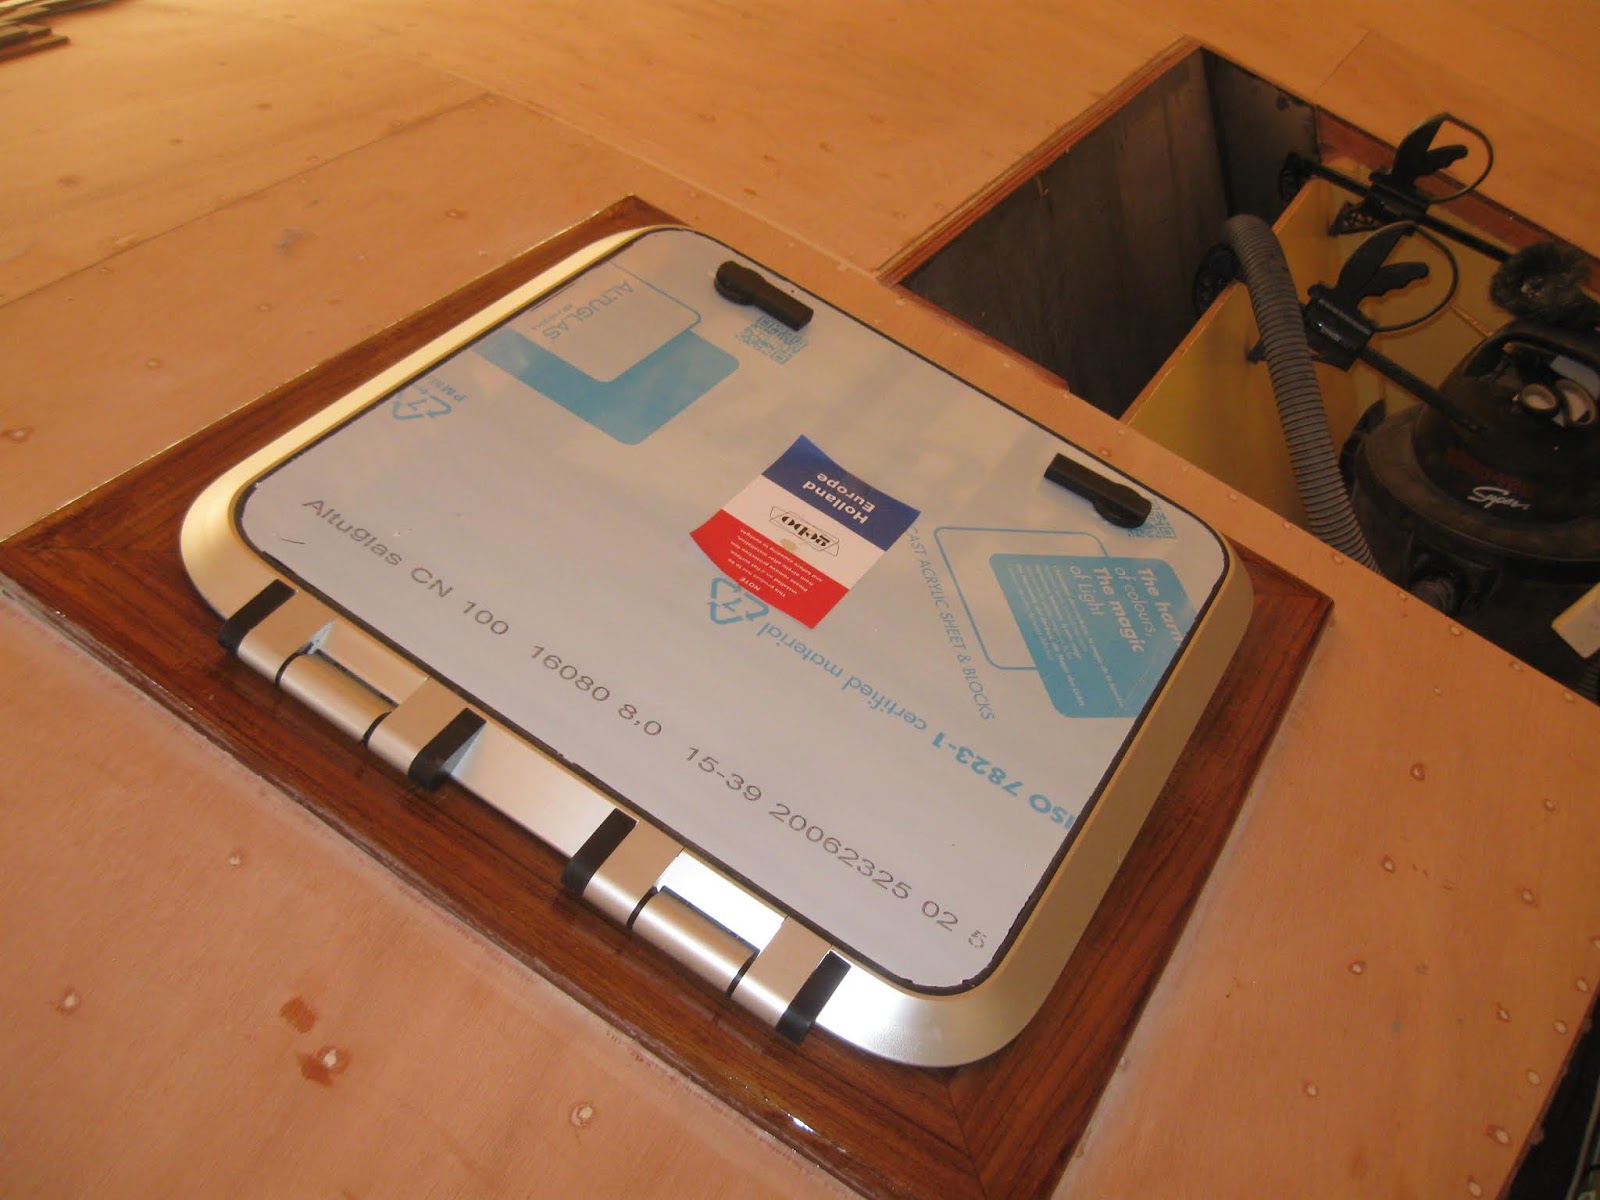
 I also had a small hatch, intended to go over the galley. I bought it at a knockdown price for Fantail, but never fitted it.  Just right for Fánshì.

 Again I made a frame for it.  This time I could salvage some teak from an unwanted galley rack that I had been given.

 Fitting the forehatch.

 The galley hatch frame coated.

 I purchased a tube of grey Simsons Marine Glue and applied it lavishly to the hatch.  Supposedly, these hatches are to be level +/- 1mm.  In my wildest dreams I would never achieve this.  I relied instead on using heaps of mastic and just tightening the bolts gently.  Whether it will leak, only time will show.  Being lightproof is not necessarily the same as being waterproof.

 The little hatch was also framed up.

 As you can see, 'little' is the operative word! Still, it's only a little boat.

 I thought of a very cunning plan to line up the framing, using pieces of ply to overlap the joins to keep it even.  The screw was used as a handle to line up the final piece.

 I then used the wee router to trim the head liner and did the same at deck level.  As you can see, I still haven't fitted the trim; this is supposed to be a Sunday job, but as I am typing this at 3.50 pm and still have a way to go, you can see that Sundays tend to get rather over committed.

 Noel Barrot, a well-known and awe-inspiring boatbuilder, comes by to look at my progress on occasion.  He is very kind and never winces at my 'joints'.  He suggested that I pre-bend my covering boards by slowly forcing them into a curve and then holding them down with thumb cleats, while they get the idea.

 Ready to install the galley hatch.  The Simsons cleans up really easily.  An endearing trait.

 And there it is, finally in place.

So now I can get on with the decks.  My stock is in two widths, due to having come from thicker material that had a rebate and that was split in two.  So I laid out all the teak that is required to cover the centre deck.  I have just enough of the wider material.  I used narrower stock on the foredeck and what's left will be used up in the cockpit until I run out!!

 The camber makes the bending of wood nearly impossible - 230 mm of deflection is a lot.  Anyway, I scavenged through the pile of bits that I've been given and acquired and glued lengths together to get approximately the required shape for the after bulkhead.

It cleaned up quite nicely and I temporarily screwed it in place, out of harm's way.  The forward end is much shorter and I will probably laminate the wood for that in situ, possibly facing it so that the laminates don't show.  Lack of finances does mean that some jobs take longer than they might.  No worries, it's all good fun!

Once the covering boards/margins are in place, it will be time for cutting and laying the deck, proper.

03 March, 2019

Mixture same as before


Well, if you thought that last lot of photos of sheets of plywood being laid down were less than exciting, here are more of the same.  However, I'm pleased to report that all the 4mm ply has been glued down atop all the 6mm ply and I am now ready to cut holes for hatches and lay teak.  Or maybe the other way round.  We shall see.  I'm frankly terrified at the thought of cutting said holes!  

 David and I had originally agreed to have a little canopy overhanging the after end of the cabin.  There is one on Fantail that does a fine job of keeping out the rain if there's no wind.  However, I've decided against this for three reasons
  1. Fánshì doesn't have a sloping cabin back, so there is less chance of the rain coming in the companionway.
  2. I am going to have a pram hood, which will keep out the rain and allow ventilation even more effectively than the folded down 'washboard'.
  3. I think the camber is more pronounced on Fánshì than on Fantail.  There's a reasonable chance that it will catch me in the back of the neck, if I'm sitting against the cabin back - it will probably be intensely uncomfortable for anyone else.
Anyway, I'm making the deck just about flush with the back of the cabin and used my little router to trim it.

 Laying the 4mm was hardly rocket science.  However, with the temperatures still in the high 30s, it would have been impossible to lay large sheets, even if I could have handled them.  I laid them out to cover the butts in the 6mm, but in truth, as those all landed on beams and stringers, this was hardly necessary.  I tried using staples, but they were such hard work to remove, that I went back to screws again.  I didn't want to leave the staples in because not only would they be hard on the sandpaper, but would undoubtedly interfere with the screws required for the layers of teak to follow.  Even if I had been glassing the deck, they would have been a nuisance.  Bronze and plastic staples don't appear to be available in NZ.

 The 4mm plywood flopped into place much more readily than the 6mm had.  It was now that I discovered what I'd already heard about: the thickness of plywood is nominal.  Apparently, it all rather depends on when they change the sandpaper on the huge belts they use for finishing the plywood.  So the finished sheet can vary in width by over a mm.  This hardly shows when you're using 12mm ply, but becomes quite apparent on 4mm.  It was easy to tell, when I started filling the gaps with smaller pieces, whether or not they had come from the same batch of plywood (the 4mm I've used was bought on two separate occasions).  Still, that's why Mr Makita invented random orbit sanders.  (The belt sander was uncooperative on the steeply sloping deck).

 Due to the framework of the shed getting in the way, it's hard to see that this photo shows a saw, trimming off the bilgeboard case.  David, very sensibly, suggested that I should use this extension to hang the blocks for raising and lowering the board.  However, the acute angle is making it really difficult to fit the decking, so in the end I decided to take it off.  I can always rebuild a smaller version if I can't think of a slightly more elegant solution!

Abaft the bilgeboard cases, I used strips of plywood, having sawn the full sheet into three.  Again, I staggered these more for the 'feel good factor' than from any real necessity.  These longs strips appear to have ironed out most of the bumps and hollows still remaining after sanding.  I am not a professional boatbuilder.  The deck will support the structure and keep out the water, even if they are far from perfectly even.

And so, here we are: a bit of sanding and filling and then it's teak time.  (Actually, sadly there are quite a few other things I have to do before I can start laying the decks, but it does seem imminent!!

17 February, 2019

Closing her in


We are having a wonderful summer, here in New Zealand.  At least it is a wonderful summer for those lucky enough to be able to spend it outside.  I would have been seriously wondering about my sanity at building a boat where the temperature is reaching 38°C by lunchtime and staying there until 5 o'clock or so, but progress had been satisfying and I keep thinking of being out there, anchored in some quiet and beautiful spot ...


 I haven't got that many photos, this time, because one piece of plywood looks remarkably like another!

This one shows me putting the thickened epoxy on a deckhead panel, ready to screw into place.  The rest of the plywood is bare - it will be coated once it's in place.  It's less stiff and recalcitrant if it's not precoated.

 Fitting the deck head panels was definitely not a favourite job.  It was very difficult to cut them accurately to shape because they only need to sag away from the deck beam a tiny bit to end up being marked too short.  Still the trim will hide the gaps.

 The final piece of headliner fitted in place.  I made an extra little 'beam' for it to land one, because I am not going to have the headliner around the pram hood.  Most of it will be cut out anyway, so it hardly seemed worth the effort of fitting.

 This photo shows the extra deck 'beam' with the lining in and ready for its insulation.  Plenty of screws are required to persuade the plywood into place, even along the flat, outside area of the deck.  There has been considerable attrition among the screws, with many making a successful leap for freedom.  I think some sort of toe rail might be a good thing!

 With the high temperatures, even the super slow hardener is kicking off fairly quickly, so I kept the panel sizes down to something sensible.  This also makes them easier to handle especially when I put them down - I don't want them sliding and scraping off all the glue!

 Next one ready to go.  The little grey device is my old barometer, which is convinced that we are in the middle of the deepest depression ever recorded, but still shows the temperature accurately.  It's probably 5 or 6°C warmer at deck level than at ground level, so it's worth knowing.


 Spreading the glue without getting it all over me was a bit of an issue, here.  I am wearing a knee pad, bceause my left knee is suffering from "deck layer's knee", and is presently swollen and rather painful, although it seems to be responding to padding and Ibuprofen.  I remember now that I had the same issue when filling in all the screw holes on Badger.  You can see the blocking next to the hatch, to take the bolts for the winches.


 And here we are - the boat is finally closed in!

"All" I need to do now, is to put down a layer of 4mm plywood all over the deck, followed by the teak and then the deck is done. the lockers next to the bilgeboards require lids and of course there will be various pads for winches, etc.


03 February, 2019

Finally I get to varnish!


I have been working really hard on the boat these last few weeks, well aware that Time is Going By and that everyone else is off sailing while I'm still in a boat shed.  This has meant that my Sundays 'off' have been more than usually busy, plus of course there was the Tall Ships Regatta.  All this is to explain why I haven't blogged for a while.  So lots of pics today to make up for it.

 I may have already mentioned these natty little floor rings from Classic Marine.  There is still a wee bit of space for dust to get into the bilges around them, but they are the best that I've seen and feel robust when you use them to lift up the sole.  They don't hold the boards down of course.  If I go offshore, I'll probably simply put screws in for the passage.

 Making the cabin sole is definitely one of the 'lolly jobs' and I am so pleased with the end result.  The tigerwood sands to a beautifully, satiny finish that feels lovely under one's bare feet.

 Another lolly job - and a rather scary one - is making the saloon table.  Many boats have tables that are works of art.  A friend has just told me how she inlaid hers, but I don't have that level of skill, so am keeping it very simple.  I had made a 'pattern' out of MDF and scrap plywood to test out the idea.  Because of the fore and aft bulkhead next to the dinette, the table needs to be able to slide so that one can get access.

The table is designed to fold, but instead of the leaf folding down, it will fold up and lie on top of the other one.  This avoids the irritating business of everyone having somehow to remove their knees when you want to extend the table.  It also gives more leg room when the leaf is up.

 I agonised for ages over the height of the table, and finally got my friend, Alan, to sit at it.  I had a moment of cold panic - it was only just high enough and I'd thought of knocking off another 50mm to suit me!  As I would like my friends to be able to be comfortable, I have compromised.  Of course, the definition of compromise is that no-one is happy!  This photo also show the table top slightly off centre - slid to one side.

 I then glued two pieces of tigerwood together to make substantial feet, for bolting the table down.  I cut them to a shape that I hope will avoid toe stubbing.

 Oh no!  More hinges and they caused me just as much grief as all the others.  Somewhere in my brain the synapses fail where hinges are concerned.  I hate fitting them with a passion!

 But they do look rather nice.  As long as you don't look too closely.

 Meanwhile, I've been working on the headliner, cutting the plywood, fitting the pieces, coating it, painting it and finally gluing it up.  Two more pieces are waiting to go in, but I decided to leave them off until I'd done the varnish.

 So while glue is setting on the table and paint is drying on the headliner, I may as well complete closing in the boat by laying the decks.  As you can see, even 6mm ply doesn't exactly flop over the camber.

 I had plenty to screw to at the forward end, with all the reinforcing for the mast.  It was good to start off with a fairly straightforward piece.

 However, the next piece presented rather more of a challenge, requiring far more screws than I'd originally anticipated.  Even my vast weight on the edge of the panel only just persuaded it to bend.


 And the matching one on the other side.  Gluing things down in temperatures of over 35ºC is not a lot of fun, even with super slow hardener, and can get a little stressful.  Thank heavens for battery screwdrivers!

 The next panel has to go between the bilge board cases: I'm still working out exactly how to cut them down.  The original idea was to hang the control blocks from them, but I have visions of some large person slipping and landing with all their weight on the 12mm plywood, breaking it off.  So I think I'll trim them flush and invest in some stand-up blocks to take the lines.

 When I dry fitted the panels, I discovered that once forced into place on the camber, they formed hollows on the fore and aft line.  I don't quite understand this.  I'm hardly 'torturing' the ply, because the deck is horizontal (more or less!) from bow to stern.  However, mine not to reason why, so I put battens along the prevent it happening.

 Before gluing the panels in place, I put down some insulation material, more to prevent condensation than anything else.

 Then I had another session with recalcitrant plywood, trying to get it to bend as I wanted.  It would have been a lot easier if I could have done it in one piece, but the bilge board cases prevent that and I didn't want to cut them off at this stage.

 I doubt you can actually see it in the photo, but in spite of my best effort - and the batten, the panel still has a bit of a hollow.  By the time I have another layer of (4mm) ply and the teak on, I hope it will have smoothed itself out.  Anyway, it will keep out the water and strengthen the boat, which is its major purpose in life.

 I find people's attitude to the camber a bit of a puzzle.  When the boat is heeling, you can walk on the weather deck and have a pretty level area to move along.  When the boat is upright, you can walk along the centre line (sail permitting).  I don't see the issue myself, but the camber draws a lot of negative comment.

 I am leaving the stove installation right to the end.  I've put a few tiles in place behind it.  They don't really do much, but they look nice.  Supposedly you are meant to leave miles of space around a heater, but I've lived with many and I doubt any of them complied.  The one I'm fitting has good heat shields and will be 100mm from 'combustible surfaces'.  I don't think it will set fire to the boat, as long as I don't crank it up too far!  And as I only have a small space to heat, I'm unlikely to do that.

Finally, I could get down to one of my favourite jobs, varnishing this lovely wood.  Masking tape was required around the white paint, which is only a semi gloss finish.


 I put three coats on the areas that will get hard wear, two coats everywhere else. If only paint were so forgiving!

 I varnished under where the heater will be.  It's much easier to remove the dust from a shiny surface!  The varnish really picks out the grain in the wood - the strange mark on the kauri to the left of the passageway is in fact a golden whorl of wood that literally glows.  It's quite beautiful.

 I like the contrast of the tigerwood and the kauri.

 And the little locker doors all look rather sweet now that they are varnished.

And I've treated myself to two lovely brass, pumps for the galley.  I am so pleased with the way my sink has worked out.  Large enough to wash my biggest pot in, but small enough that I can use fresh water to do so.

So back to the decks.